|
| <- prev |
| Using "Startup environment creation tool" -> Common options |
Common options for "Startup environment creation tool"
Various option settings are possible when embedding in a hard disk, creating
a CD image, and setting a USB flash drive.
By setting various options here,
it is possible to realize an erasing environment with a unified policy within
the company, such as fixing the erasing method and fixing the processing options
in the "Boot up erase program".
The following common options are also effective when installing the "Windows
Erase Program" in WindowsPE. For an explanation of the operation by specifying
options, see "Creating
WindowsPE configuration file".
Method/Auto
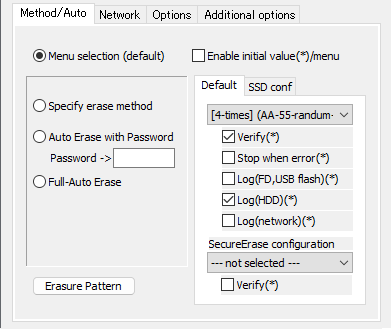
Menu selection
Start "Boot up Erase Program" in the normal menu selection format.
| MEMO |
| The image on this page, which is surrounded by a black frame as shown
below, is the screen of the "Boot up Erase Program". Other than that, it is the screen of the "Startup environment creation tool" of Windows. |
Enable initial value (*) /menu
If checked, you can specify the initial values for the following items. This is valid only in the "Menu selection".
If unchecked, it will be the system default value.
・ Verify (Default, SecureErase, SSD conf, SSD SecureErase)
・ Stop when error
・ Log(FD, USB stick)
・ Log(HDD)
・ Log(Network)
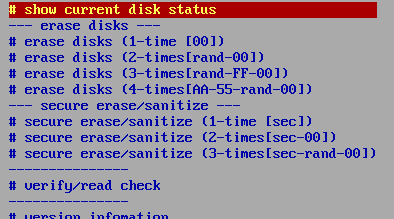
Specify erase method
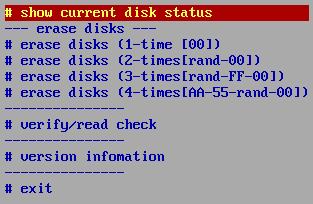
Shows only the specified erase method.
The display menu will only display the selected ones, as shown below.
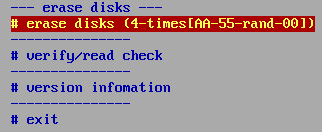
On the erase screen, the specified options such as "Stop when error" and "Log" are fixedly displayed,
so that the user cannot change them.

* For details on the erasing method and processing options, see "Erase disks".
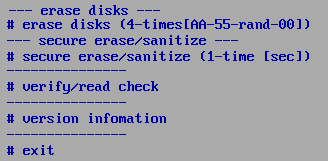
SecureErase configuration
If you select a process other than "--- not selected ---", the specified
secure erase menu is additionally displayed.
However, if a disk that can execute "Secure Erase"/"Sanitize" is not connected
(including the frozen state) on the booted computer, the Secure Erase menu
will be displayed and cannot be selected as shown below.

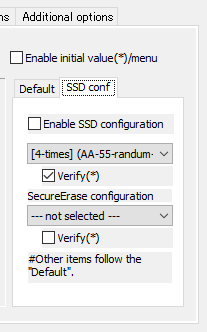
SSD configuration
If an SSD (including ATA-SSD, eMMC, NVMe) disk is connected to the booted
computer,
you can specify a different process for the SSD than for the
HDD.
・ When only the HDD is connected ... Only the processing menu specified in
the [Default] settings is displayed.
・ When only SSD is connected ... Only
the processing menu specified in the [SSD conf] settings is displayed.
・ When both HDD / SSD are connected ... Both of the processing menus specified
in the [Default] settings / [SSD conf] settings are displayed.
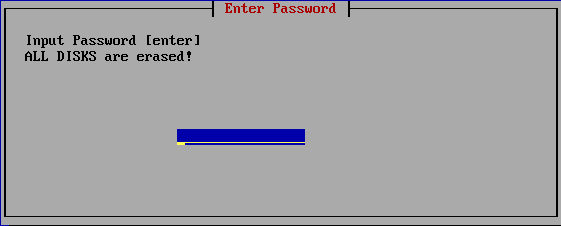
Auto erase with password
If you make this selection, when the "Boot up Erase Program" starts, the
password entry screen will be displayed as shown below.
If you do not
enter the specified password here, you will not be able to proceed.
If you
specify the correct password, the menu selection screen will not be
displayed after that,
and all
connected disks (up to 4) will be erased automatically.
Different disks are processed in parallel on each screen displayed by ALT +
F1-F4.
As with "Specify Erase Method", the erase method and erase options (such as
"Stop when Error") are fixed to the specified values.
The text "Enter password", "Input Password [enter]", and "ALL DISKS are
erased!" can be customized as desired.
See "Additional options" at the
bottom of this page.
* Password can be up to 10 characters. Half-width alphanumeric characters can
be used.
* The password is not for security purposes, but is for
confirming the erasure, avoiding that the erasure starts automatically just by
turning on the power.
* The password is saved in a text file that can be
easily viewed on the boot CD or USB flash drive.
SecureErase configuration
If you select a process other than "---- not selected ---", the specified
Secure Erase will be executed if a disk that is ready for Secure
erase/Sanitize is connected.
SSD configuration
If an SSD (including ATA-SSD, eMMC, NVMe) disk is connected to the computer,
the process specified in the SSD configuration will be automatically performed
for the SSD.
・ When only the HDD is connected ... Processing specified in
the "Default" settings.
・ When only SSD is connected ... Processing
specified in the "SSD conf" settings
・ When both HDD / SSD are connected ... Processing specified
in the "Default" settings for HDD, "SSD conf" settings for
SSD.
Full-auto erase
If you make this selection, when the "Boot up Erase Program" is started,
all connected disks (up to 4) will be erased
automatically without waiting for any operator input.
As with "Specify Erase Method", the erase method and erase options (such as
"Stop when Error") are fixed to the specified values.
| Warning! |
| If you unintentionally leave the created CD or USB flash drive on
the PC, the next time you turn on the power, it will boot from the CD, etc., and all the disks on that PC will be erased. Remove the CD or USB flash drive immediately that incorporates fully automatic execution after creating it. |
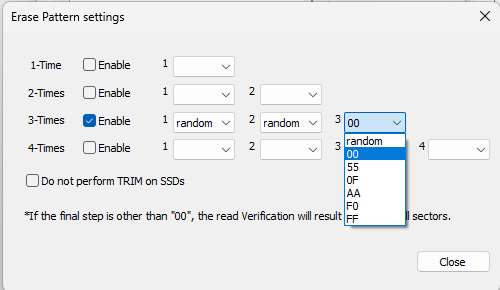
Erasure Pattern
Specifies the erasure pattern for erasing 1-4 times.
If you want to use a
pattern different from the standard pattern, set it here.
*If the final
step is anything other than "00", "Read Verification" will result in a
verification error.
Check "Enable" and specify the write value for each
erase step.
Also, for SSD drives, TRIM processing is performed if
erasing more than twice,
but if you do not want to perform this
processing,
check "Do not perform TRIM on SSDs".
Network
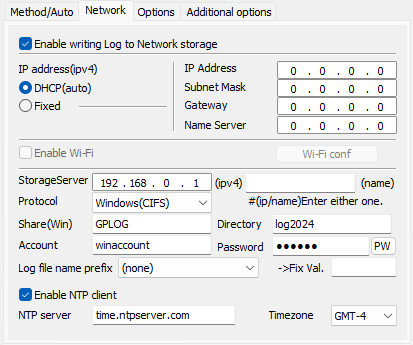
Enable writing Log to network
storage
When using the network log function, check
here and specify the following items.
If you do not want
to use network logs, uncheck it.
* If the data file (gpdata.pac) you
are using does not support the network function, it cannot be enabled.
IP address (ipv4)
Specify the IP address (ipv4). Select "DHCP" to get it automatically from the
DHCP server,
select "Fixed Value" to use a fixed value and specify the
following address.
The following does not need to be entered in the
case of "DHCP".
"IP address" --- IP address
"Subnet mask" --- Subnet
mask (255.255.255.0, etc.)
"Gateway" --- Gateway address. No input
is required when not in use.
"Name server" --- Name server address.
Required only if "Storage Server" is specified by "(name)".
Enable Wi-Fi
When using wireless LAN(Wi-Fi) for connection, check this box and set "Wi-Fi
conf.".
* If the data file (gpdata.pac) you are using does not support the Wi-Fi
network function, it cannot be enabled.
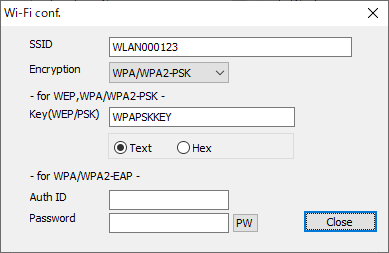
SSID
Enter the SSID for Wi-Fi connection.
Encryption
Specify the authentication encryption method for Wi-Fi connection.
You can
select from the following.
(none)
WEP
WPA/WPA2-PSK (TKIP)
WPA/WPA2-EAP (EAP-PEAP,TKIP)
Key(WEP/PSK)
Specify KEY for
WEP, WPA/WPA2-PSK.
When entering in hexadecimal, select "Hex".
Auth ID/Password
Enter the authentication ID and password used for WPA / WPA2-EAP (EAP-PEAP).
When you press the "PW" button, the password you entered will be displayed.
Press it again to display "*".
However, "PW" can be displayed only when
entering a new character or after clearing all characters.
The password
is encrypted and stored in the created CD or USB flash drive, but it may be
decrypted.
If it is widely distributed, please be careful about its
management.
Storage Server
Enter the IP address or server name of the server.
It is is a FTP server or
a server with Windows shared folder.
Enter only either the IP address (ipv4)
or the server name.
Protocol
Select "Windows (CIFS)" when writing to a Windows shared folder, or "FTP" when
writing to an FTP server.
* Supports SMB 3.0, 2.1, 2.0, 1.0.
FTP is
connected in Passive mode (PASV mode).
Share(Win)
Required only for "Windows" connections.
Specify the Windows share name to
connect to.
Write permission is required for the shared folder .
Directory
Specify the name of the directory (folder) to write the log to.
If left
blank, it will be written to the shared folder for Windows shares and to the
home directory for FTP.
It is not necessary to add "\", "/" at the beginning
and end. (Even if it is attached, it will be ignored)
Specify the directory
delimiter with "\" or "/".
example:
gp\2012\log
gplog/2012
For the specified directory, create / write a file, read the file size, and
delete the written file (during a write test) are performed. Please set the authority
appropriately.
Since file data read permission is not required, write-only
operation is also possible.
* Even if you do not have permission to
delete the file, the process will continue,
but the file written in the
write test (that is automatically performed before the erase process) will
remain unerased.
Account/Password
Enter the authentication ID (user name) and password used for connection.
The password is encrypted and stored in the created CD or USB flash drive,
but it may be decrypted.
Please be careful about management when it is
widely distributed.
For example, creating an authentication ID dedicated to
log storage that can be written only to the specified folder.
When you
press the "PW" button, the password you entered will be displayed. Press it
again to display "*".
However, "PW" can be displayed only when entering a
new character or after clearing all characters.
log file name prefix
It is possible to add special characters to the beginning of the log file name
to be written.
(none) ・ ・ ・ It will be a normal file name.
[date(month,day)][hour][minute][second].log
ex: Log created at
13:08:12 on June 5th -> 0605130812.log
Fixed val ・ ・ ・ The character entered in the "Fixed val" field is added to the
beginning.
[Fixed
val]_[date(month,day)][hour][minute][second].log
ex:
Fixed val: SZ
Log created at 13:08:12
on June 5th ->
SZ_0605130812.log
[Additional info1]/[Additional info2]
・ ・ ・ The value entered by the operator in "Option"/"Additional info" is added to
the beginning.
ex:
When "nomura" is entered
in "Additional info1"
Log created at 13:08:12
on June 5th ->
nomura_0605130812.log
If the input value
contains characters that cannot be used as a file name, it will be replaced with
"_".
For "Additional info",
see "Options" / "Enter additional info" below.
Enable NTP client
If enabled, the time will be synchronized with the specified NTP server when the
erase program starts. "Enable writting log to network storage" must be enabled.
NTP server
If you check "Enable NTP client", specify the server to synchronize time with.
Specify by IP address (IPv4) or server name.
When using a server name,
it is necessary to specify a "Name server".
Timezone
If you check "Enable NTP client", specify the time zone of the PC.
Specify
between GMT-12 and GMT+12.
For example,
San Francisco (USA)
, "GMT-7"
New York (USA) , "GMT-4"
Berlin
(Germany) , "GMT+2"
New Delhi (India) , "GMT+5"
Tokyo (Japan) , "GMT+9"
Options
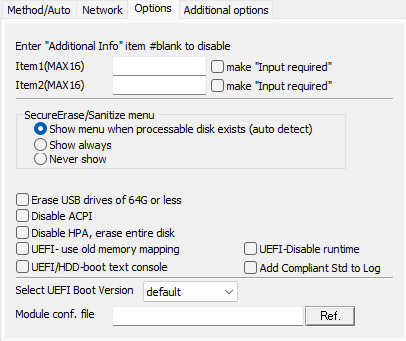
Enter "Additional Info" item #blank to disable
If you specify a value for the "Item1"/"Item2", the following screen will be
displayed before the erase menu is displayed, prompting the operator for
input.
If you select "make 'input required'", you will not be able to
proceed unless you enter some value in that item.
If it is not " input
required", you can move to the next even if it is left blank.
The
"Item1"/"Item2" can be up to 16 single-byte alphanumeric characters (spaces
allowed).
You can disable it by leaving the them blank.
It is
convenient to use it for the person in charge of processing, the in-house
management number of the PC, etc.
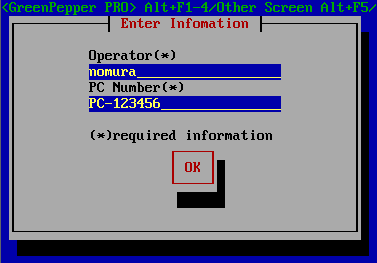
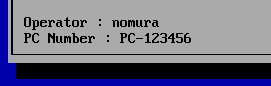
In the example of this screen,
Item1: "Operator" Required
Item2: "PC
Number" Required
The entered content is displayed at the bottom of the menu and written to the
erasure log.
Display at the bottom of the menu
Write to Log
* Written in the area subject to tampering check.
|
=== --- disk erase log ---------------------------- Operator : nomura PC Number : PC-123456 disk : ATA ST3160813AS (156290904 kbyte) rev:SD2B ser:9SY082C5 method : 4-times[AA-55-rand-00] -> verify ...... omitted below === 92ae1655be5a5b95977863ac87c637a5 |
SecureErase/Sanitize menu
Specify when to display "Secure Erase / Sanitize" in the menu.
* Menu
when "Secure Erase / Sanitize" is displayed
Show menu when
processable disk exists
In the following cases, "Secure Erase /
Sanitize" is displayed.
* When there is a disk that supports Secure erase and is not in a Frozen
state.
* When there is a disk that supports Sanitize.
This is the
default value for the "Product CD-ROM".
Show always
"Secure Erase / Sanitize" is always
displayed.
* Even if it is Frozen state, it will be displayed in the menu.
However, if there is no disk that supports Secure erase / Sanitize, the
following will be displayed.

Never show
"Secure Erase / Sanitize" is not displayed in any
case.
Erase USB drives of 64G or less
Normally, a USB drive of 64 Giga bytes or less is interpreted as a USB drive
used for writing logs and booting, and is excluded from erasure.
When this
option is enabled, no such exclusion is made and all USB drives are also subject
to erasure.
Especially when erasing by automatic execution, if the USB flash
drive is the target of erasure, the USB flash drive used for startup will also
be automatically erased.
Therefore, when booting
from USB flash drive, use a USB flash drive of 64GB or less and do not check
this.
Disable ACPI
Generally, it does not need to be set.
On some PCs, if this option is not
enabled, it may stop during startup and not proceed to the menu display.
First, try booting with ACPI disabled by specifying options at startup of
"GreenPepper PRO". If you can start it that way and you need to erase many of
the same PC models, it is convenient to check here.
Refer to "Boot
from CD/USB flash drive" for how to boot with ACPI disabled.
If ACPI
is disabled, general PCs may not be able to recognize the disk or the power may
not be turned off automatically.
Disable HPA, erase entire disk
For HPA (Host Protected Area), see "Points to
consider about erasing method".
If you want to temporarily disable HPA,
it is convenient to specify options at startup to disable HPA.
For the boot
method with HPA disabled, refer to "Boot from CD
/ USB flash drive".
It can also be disabled by the "Utility"/"Remove
HPA / Reset DCO" process after startup.
If you need to disable HPA and
erase many of the same PC models, it is convenient to check here.
* HPA
specifications may not be valid, such as when connecting to a USB interface.
UEFI- use old memory mapping
Generally, it does not need to be set.
This setting is valid only at startup
in UEFI.
If there is a problem such as stopping in the middle without
completing the startup, please try this option
UEFI- disable runtime
Generally, it does not need to be set.
This setting is valid only at startup
in UEFI.
If there is a problem such as stopping in the middle without
completing the startup, please try this option
If you make this
specification, other problems may occur, such as the computer name not being
displayed or the power not turning off automatically.
UEFI/HDD- boot text console
This setting is valid only at startup in UEFI.
If checked, the initial
screen at startup will be a text display. That is unlikely to cause problems on
many models.
If the startup screen is not displayed at all and "Green Pepper
PRO" starts automatically after a while, or the screen is too small to see, try
this specification.
Add Compliant Std to Log
The erasing standard that complies with is displayed in the erasing log as
shown below.
Only when there are no errors in the erasure process and
verification process.
Log example:
| === --- disk erase log ---------------------------- disk : xxxxx method : 2-times[rand-00] -> verify start: xxxxxxxx end: xxxxxxx error : write(0) read(0) verify(0) status : finished (no error) standard : NIST.SP.800-88.Rev1(clear) compliant ----------------------------------------------- |
| Disk type | Erase method | Description |
| ATA(SATA,PATA) HDD | 1time-4times erase + verify | NIST.SP.800-88.Rev1(clear) |
| 4times erase + verify | DoD 5220.22-M Sup1(1995) | |
| Secure Erase/Sanitize(1time-3times)+verify when following method is executed. *Secure Erase/Enhanced Secure Erase *Sanitize(OVER_WRITE). |
NIST.SP.800-88.Rev1(purge) | |
| 3times erase + verify *random-random-00 is specified |
NSA 130-1 | |
| ATA(SATA,PATA) SSD | 1time-4times erase + verify Secure Erase/Sanitize(1time-3times)+verify when following method is executed. *Secure Erase/Enhanced Secure Erase |
NIST.SP.800-88.Rev1(clear) |
| 4times erase + verify | DoD 5220.22-M Sup1(1995) | |
| Secure Erase/Sanitize(1time-3times)+verify when following method is executed. *Sanitize(BLOCK_ERASE) |
NIST.SP.800-88.Rev1(purge) | |
| 3times erase + verify *random-random-00 is specified |
NSA 130-1 | |
| NVMe (SSD) | 1time-4times erase + verify | NIST.SP.800-88.Rev1(clear) |
| 4times erase + verify | DoD 5220.22-M Sup1(1995) | |
| Secure Erase/Sanitize(1time-3times)+verify when following method is executed. *Secure Erase *Sanitize |
NIST.SP.800-88.Rev1(purge) | |
| 3times erase + verify *random-random-00 is specified |
NSA 130-1 | |
| SCSI(SCSI/SAS) | 1time-4times erase + verify | NIST.SP.800-88.Rev1(clear) |
| 4times erase + verify | DoD 5220.22-M Sup1(1995) | |
| 3times erase
+ verify *random-random-00 is specified |
NSA 130-1 | |
| eMMC,USB Flash etc. | 1time-4times erase + verify | NIST.SP.800-88.Rev1(clear) |
| 4times erase + verify | DoD 5220.22-M Sup1(1995) | |
| 3times erase
+ verify *random-random-00 is specified |
NSA 130-1 |
Select UEFI Boot Version
Generally, it does not need to be set, select "defult".
For some older PCs,
it may not boot properly.
When such cases, select "old ver-1" or other.
For example, some old Fujitsu LIFEBOOK need to set "old ver-1".
Module conf. file
Generally, it does not need to be set.
The "module configuration file" is a file that describes the driver modules for
the disk interface and network interface.
It is used in the following cases.
* When specifying parameters different from normal
* When installing a
driver that is not automatically installed
* If you do not want to install
the automatically installed driver
If there is a problem with the standard settings, use the file provided by us,
or please create and use the file yourself.
The file format is as follows.
-------------------------------------------------------
[before]
(A module that is forcibly loaded before loading a system-recognized module)
[match]
(Use the specified parameters when loading a system-recognized module)
[noload]
(If the module recognized by the system matches the specified one, it will not
be loaded)
[after]
(Module to be forcibly loaded after the system -recognized modules have been
loaded)
-------------------------------------------------------
* ASCII text file. Line breaks are CR + LF or LF.
* Lines starting with "#"
are ignored as comments
* Describe only the necessary sections
* The
module description is only the module name, excluding ".ko", path, etc.
*
Only modules that can be described are those in "Supported
SCSI / RAID cards" and "Supported network
interface card".
* Describe the parameters according to the kernel
version. You can see kernel version in "Technical
Specifications" page.
* Describe parameters after the module name with a
space.
Example: When specifying the "topology=2" for the Fibre Channel module, "lpfc"
-------------------------------------------------------
[match]
lpfc topology=2
-------------------------------------------------------
Additional options
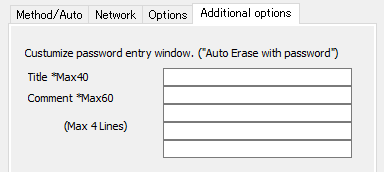
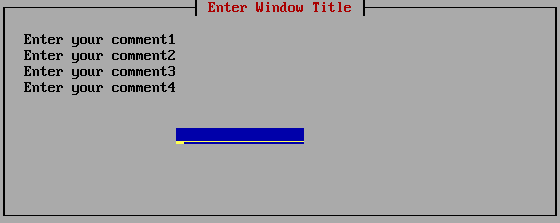
Title / comment
Specify the display text on the initial password input screen during "Auto
erase with password".
Example:
Title: Enter Window Title
Comment:
Enter your comment1
Enter your comment2
Enter your comment3
Enter your comment4
When set in this way, the
following screen will be displayed.