|
| <- prev |
| Operation of "Boot up Erase Program"-> Utility |
Operation of "Utility"
Utility screen
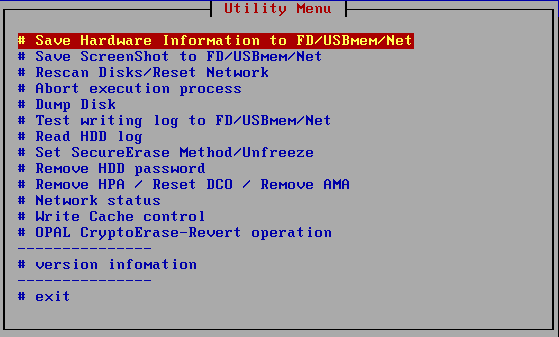
When the "Bootup Erase Program" menu or the operation screen is displayed,
press "ALT + F5" to display the following utility menu.
Common operation when writing to FD / USB flash drive
| Floppy disk and USB flash drive must be prepared and inserted at
startup. Format the floppy disk in MS-DOS format and the USB flash drive in
FAT / FAT32 / exFat. * USB flash drive over 64G cannot be used for log storage. * Built-in FD drive and USB-connected FD (1.44MB) can be used. If you insert a USB FD/flash drive after displaying the menu, execute this utility screen "Rescan Disks/Reset Network". |
Save Hardware Information to
FD/USBmem/Net
If there is any problem such as the disk is not recognized or the network does
not work, this process is used to acquire the information of your PC.
The
acquired information is saved as "HWINFO.TXT" on the connected floppy disk or
USB flash drive. If the network settings are valid and writing to a floppy
disk/USB flash drive cannot be performed, the data will be written to the
network share.
When written to the network share, the file name will be
"hwinfo_mmddhhMMss.txt" (month, day, hour, minute, second).
Please send
the saved information file to us.
The file is a text file. You can check the contents in advance with a notepad
etc,.
If you see the message "could not write file (Net)", then there is an error
saving to the network share.
For details and how to deal with it, see "Using
"Network log"/ Trouble shootings".

Save ScreenShot to FD/USBmem/Net
It is used when there is some problem in processing, or when you want to save
screen information and use it as a processing record, or when you want to
maintain a manual. The screen shot (hard copy) is saved as a binary screen file
(* .stx) on the FD / USB flash drive.
If the network settings are valid and
writing to a floppy disk/USB flash drive cannot be performed, the data will be
written to the network. When written to the network, the file name will be
"mmddhhMMss.stx" (month, day, hour, minute, second).
The (* .stx) file is a hard copy file for Linux.
Use the "stx2bmp.exe"
program that comes with the product to convert it to an image file (* .bmp).
If you see the message "could not write file (Net)", there is an error saving to
the network share.
For details and how to deal with it, see "Using
"Network log"/ Trouble shootings".
Rescan Disks/Reset Network
When the USB flash drive is inserted or the disk is hot-swapped after the boot
is completed, this process updates the disk environment to the latest state. In
addition, the network environment will be reset.
The screen shows the status
of drivers installed and the network status, so you can use it to check the
status. When the process is completed, "press [enter]" will be displayed at the
end, so press the [enter] key.
All screens (ALT + F1-F4) must be
returned to the menu to perform this process.
Abort execution process
It is used to interrupt the process ,when the processing of "erase disk",
"verify/read check".
However, it cannot be interrupted during the Secure
Erase step in "secure erase".
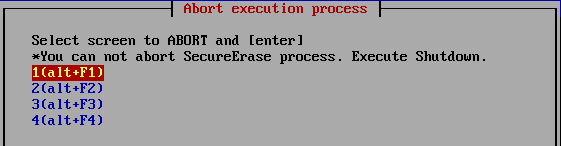
Select the screen (1-4) where the process you want to interrupt is being
performed, and press the [enter] key.
Dump Disk
This is a function that displays the contents written on the disk as they are.
You can actually see what the contents of the disk are now.
In the
list display, select the disk to dump and press [enter].
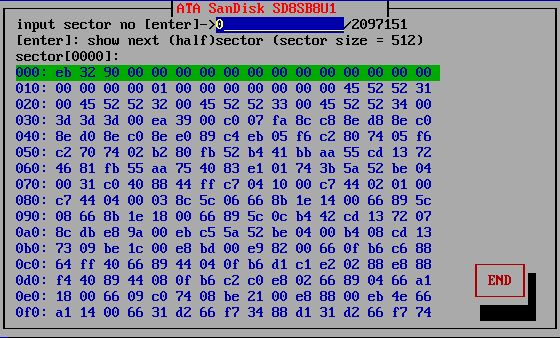
The contents of the current sector (1/2 sector = 256 bytes) are displayed in
hexadecimal.
If you press [enter] in this state, the next 1/2 sector will
be displayed.
You can also display the contents of the specified sector by
directly entering the sector number and pressing [enter].
Test writing log to FD/USBmem/Net
Tests whether the disk erase log can be written.
You can make sure that
the logs are really written by testing them before you start the erasure
process.
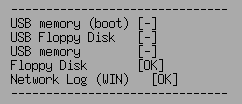
If the write is OK, [OK] is displayed, if the write fails, [ERROR], and if the
device cannot be found, [-] is displayed.
Network log error code

For details and how to deal with it, see "Using
"Network log"/ Trouble shootings".
Read HDD log
The HDD log, written when "Log (HDD)" is selected in the erase process is read
from the disk and displayed.

After selecting the disk you want to display in the list,
[Show log] Shows
log on the screen.
[Copy log] Copy and save the contents of the log to the
FD / USB flash drive.
If the network settings are valid and writing to a
FD/USB flash drive cannot be performed,
the data will be written to the
network share.
[Del log] Delete the log from the disk. Writes zero only to
the written part of the disk log.
Set Secure Erase Method/Unfreeze
Used to perform secure erase method selection ,secure erase processing
test (ATA drive) and Unfreeze process.
In the list display, select the disk to process and [Set
Method] or [Test Secure Erase].
In the list view, the supported secure
erase processes are displayed.
sec: Secure Erase
enh: Enhanced Secure
Erase
* If "X" is displayed before "sec" and "enh", it is in a "frozen"
state.
stz: Sanitize
* If there is no disk that supports secure
erase / sanitize, "*** NO supported disk ***" is displayed.

Secure
Erase Setting (Set Method) (for ATA,NVMe,eMMC drives)
The normal "Secure Erase
/ Sanitize" process automatically selects and processes the most effective
method supported by the disk.
If you want to perform a specific method, or
if an error occurs in the automatically selected method, you can specify the
method here.
The specified method is performed by "Secure
Erase / Sanitize".
The corresponding methods are displayed as shown
below. Select the method with the space key and press "OK".The method to be
executed is registered.
When the "Secure Erase /
Sanitize" process is executed next time, the selected method is performed.
(*)Auto(default) ( )Secure Erase ( )Enhanced Secure Erase ( )Sanitize/Block Erase ( )Sanitize/Over Write ( )Sanitize/Crypt Scramble |
* If the process is not supported, you will not be able to select it as shown
below.
--- Sanitize / Over Write
Test Secure Erase (only for ATA drives)
* This test is for ATA (IDE, SATA) drives. Not used for NVMe and eMMC drives.
It does not actually erase, it only tests whether the command
processing step of secure erase processing is processed without error. The
process may take up to 1 minute.
No actual secure erasure can be done unless this test is OK.
However, even
if it is OK, there is a possibility that an error will occur in the actual
erasure.
For details on processing interruptions and errors that may occur, see "Secure
Erase/Sanitize".
In the list, select the disk you want to test and press [enter].
If the
test is OK,
Secure Erase execution test [OK]
In case of error
Secure
Erase execution test error[error code]
Message is displayed.
Unfreeze
Perform Suspend-wait 3 second-Resume.
By
this process, ATA frozen state may released.
If there is no disk that
supports secure erase / sanitize, this process is not executed.
*
When performing this process, the CD/USB flash drive
used for booting must be left in without removing it.
Do not
enter any key until the confirmation screen after the process is displayed.
When the confirmation screen is displayed, press "Confirm" within 30
seconds.If "Confirm" is not pressed, the PC will shutdown.
*This is a
function for automatic shutdown when the screen is not displayed.
In order to perform this process, the video chip of the PC must be
compatible. If it is not compatible, it will not be executed even if the
process is selected, or the screen will remain black after processing and
nothing will be displayed. When it becomes blank screen, trun off the power
switch.
This process changes the screen resolution by installing the video
driver.
* NVMe drives do not have a frozen state due to their
specifications, but with some drives, secure erasing will result in an error
under normal conditions, and processing may be possible by "unfreezing"
processing.
See "Supported
display chips"
Remove HDD password
Use this when you want to erase the preset HDD password when the secure erase
(ATA disk) is interrupted and the HDD password is still set.
* In Ver4.6.x
or later, this process is not required even after the secure erasure on the
ATA disk is interrupted.
In the list, select the disk for which you want to erase the password and
press [enter].
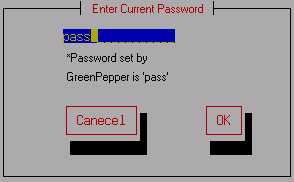
On the password entry screen, enter the currently set
password and select "OK" to complete the process.
n the "Green pepper" system, a password "pass" is temporarily set and used for
secure erasure. If you want to erase the password set in the "Green Pepper"
system, use "pass" on the screen to erase the password.
Remove HPA / Reset DCO / Remove AMA
Please note that
removing the HPA/DCO/AMA will prevent you from accessing the internal data.
Or may cause problems when reusing the disk.
Performs the process of canceling the HPA/AMA setting for the disk HPA (Host
Protected Area)/AMA(AccesibleMaxAddress) is set.
In the DCO reset process, first, only the disk size is returned to the
physical disk size.
If that process results in an error, it resets all DCO
data.
Therefore, if the personal computer assumes that setting, it may
cause an obstacle during re-installation.
However, since it only returns
to the original specifications and performance of the disk, there is no
problem in using it on other computers.
* For HPA / DCO /AMA, see "Points to
consider about erasing method" (Consideration of HPA, DCO, Recovery
area).
In the list, select the disk for which you want to remove HPA / reset DCO /
remove AMA and
press [enter].
*If multiple settings are made, processing will be
performed in the following order of priority: AMA, HPA, DCO.
Remove HPA
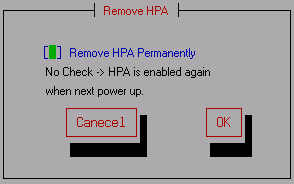
Remove HPA permanently
If checked (selected with the spacebar), the HPA will be permanently removed
and will remain removed when the disk is powered off.
If you do not check
it, HPA removal will be temporary and effective until the power is turned off.
The previous HPA settings will be maintained the next time the power is turned
on.
Reset DCO
Check "Confirm execution" (select with the space key), and then select [OK].
The DCO is reset.
Remove AMA
Check "Confirm execution" (select with the space key), and then select [OK].
The AMA is reset.
When the removal / reset is completed, "Rescan
Disks/Reset Network " is automatically performed.
Network status
You can check the current network status.
If the network is not set,
"Network configuration is not enabled" is displayed.
For the errors displayed on your screen and how to deal with them, see "Using
"Network log"/ Trouble shootings".
For details on incorporating
network functions, see "Common options "/"Network"
when creating a boot environment.
Please incorporate the network
settings when creating the boot environment.
It cannot be changed with
"Utility" etc. after starting "Boot up Erase Program".
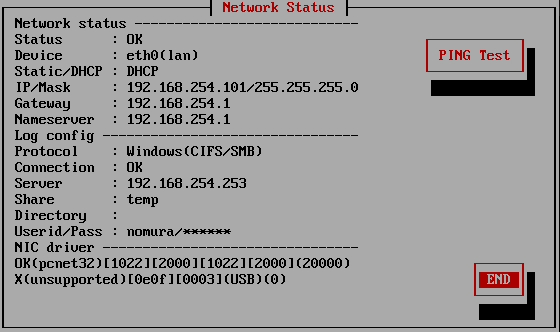
Network status
If the driver of the network interface card installed in the PC is read
correctly and the IP address (ipv4), subnet mask, etc. are enabled, "Status:
OK" will be displayed and the address etc. will be displayed.
If Status: is "NG", it means that the network address etc. have not been set.
For details and how to deal with it, see "Using
"Network log"/ Trouble shootings".
Log config
* Protocol:
Windows(CIFS/SMB) ・ ・ ・ When writing to a Windows share.
FTP・ ・ ・ When writing to a FTP server.
* Connection:
Only displayed for Windows shares.
"OK" is displayed when the connection to the Windows share can be established,
"NG" is displayed in the case of an error.
For the errors displayed on your screen and how to deal with them, see "Using
"Network log"/ Trouble shootings".
* Server:
The IP address (ipv4) of the Windows / FTP server, or the server name.
* Share:
Only for Windows shares. The name of the shared folder.
* Directory:
In Windows sharing, it is the folder to write under the shared folder.
For
FTP connection, this is the write directory after connection.
* UserID/Pass:
User ID / password for connection. (Password is not displayed)
* NIC driver
Displays the information of the network interface card used in your PC and the
status of the installed driver.
[PING Test]
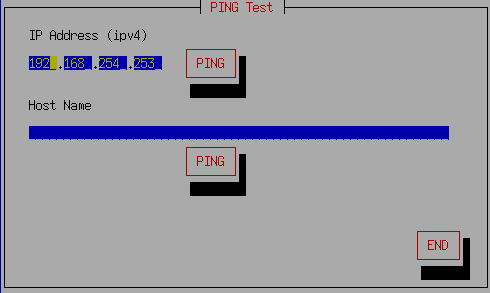
A tool for checking connections for specific IP addresses and host names.
Enter the IP address or Host Name for which you want to test the connection,
and select [PING].
If "ping test OK" is displayed, the basic connection
with the PC has been established.
* When connecting with a host name, it is necessary that the name server
(NamerServer) is set correctly and that the name server can resolve the name.
* Caution: Depending on the firewall of the PC, the PING response may be
blocked.
In that case, you may be able to connect even if it becomes NG
here.
'Write Cache' control
This is the process to change the state (on / off) of the write cache of the
disks.
The disks that can be processed are ATA (SATA, IDE) and SCSI / SAS
drives (when connecting with a compatible interface without RAID function).
In the list display, select the disk for which you want to change the
write cache and press [enter].
It can be turned on if the current state is
off and off if it is on.
Write Cache is a mechanism that the disk drive
itself has.
When writing to a disk, it is written to the memory inside the
disk drive first, and then writing to internal magnetic disk media is
performed in the subsequent processing.
By using the write cache, the
writing process of the PC software becomes faster, but there is a risk that
the data before writing to the disk media will be lost due to a power failure.
Therefore, in the initial state, the SATA drive used for desktops and laptops
is often in the write cache ON state, and the SAS drive used for servers etc.
is often OFF.
In the erase process, it is faster to process with the
write cache turned ON.
In "Green Pepper PRO", if the write cache of the
disk drive is OFF on the compatible disk / disk interface, it is automatically
turned ON at the start of erasing, and then returned to OFF after the erasing
process is completed.
Therefore, if the erase process is interrupted in the
middle, the cache status may remain ON. There are many disks whose write cache
returns to the initial state when the power is turned off. But if you want to
change the cache state for a disk whose set value is retained even when the
power is turned off, change it in this process.
In addition, in the
case of a disk with many failures such as error sectors, the failure status
can be grasped more accurately by turning off the write cache for processing.
* If the write cache is set to off on this screen, it will not be
automatically turned on even in the erase process.
OPAL CryptoErase-Revert operation
Only valid for OPAL (self-encrypting) disks.
Displays the mode and
lock status of OPAL compatible discs.
Also, using the set password, the
OPAL mode (encryption mode) is canceled and the normal ATA mode is restored.
Please note that the encryption key will be deleted and
any data inside the disk will be unreadable.
For the unlock password, the entered value is sent to the disk as it
is.
The password may be stored on the disk in the form converted by the
software, such as when operating in OPAL mode by OPAL processing software.
In that case, even if the entered password itself is correct, the password
will not match and processing will not be possible.