|
| <- prev |
| Operation of "Boot up Erase Program"-> Erase Disk drives |
Erase disk drives (1time - 4times)
If you select "Erase disks"(1time-4times), the following screen will be displayed.
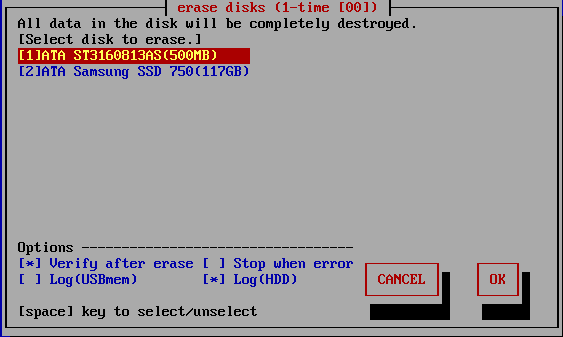
List of connected disks
The model number, capacity, firmware revision, and disk serial number of the
disk recognized by the "Green Pepper PRO" system are listed.
* For a single
disk, it is a physical disk unit, and for a RAID configuration, it is a logical
disk unit.
* For RAID disk or others, revision, and serial number may not be
displayed.
As shown below, if the message "NO supported disk" is displayed even though
the disk is connected, the disk is not recognized.
* There may be a disk
failure.

| MEMO *** If the disk does not appear in the list |
|
Check the disk hardware ・ First, check that the disk is recognized on the BIOS screen of the PC. To display the BIOS screen, see "Setting the boot environment on BIOS/UEFI". Information about the disk is displayed in this screen. ・ If Windows works, make sure that Windows recognizes the disk. Check if it is supported by "Green Pepper PRO" ・ If the interface is not supported by "Green Pepper PRO", the disk will not be displayed. ・ Please let us know the contents of "Disk Interface" displayed in "Show current disk status" * You can save the screen image to the FD / USB flash drive /Net share with "Utility" / "Save screenshot (FD / USBmem/Net)" displayed by ALT + F5. Or * Use "Write hardware information to FD / USBmem / Net" in "Utility" displayed by ALT + F5, save the PC information to USB flash drive / FD, and send the file (HWINFO.TXT) to us. |
| MEMO |
|
The beginning of the line is [1] (parentheses) are ATA (IDE, SATA) disks. <3> (parentheses) are SAS / SCSI / RAID connections. ! 1 xxxxxxxx Those with "!" Displayed are IDE disk interfaces that do not support high-speed mode (DMA) in the hardware / driver. The access is low-speed mode (PIO mode), and the processing speed is very slow. |
| MEMO - about eMMC drive |
On eMMC drives, you will often see multiple drives as shown below.
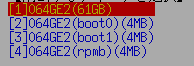 This is because one eMMC drive is divided into multiple drives. Among them, (boot0) (boot1) is the boot partition. (rpmb) is a security partition called "Replay Protected Memory Block". Both are normally not writable and cannot be erased. |
Select the disk using the [up] and [down] keys in the list, and press [enter].
* Multiple processes cannot be performed on the same disk on different screens.
Setting "Options"
When "Specify erase method", "Auto erase with password", "Full-auto erase" is selected, the specified value is displayed and cannot be changed.
See "Common Options".
* You can change the selection / deselection by pressing the [space] key while the cursor is on it. [ ]
[ ] Verify after erase
After the erasing process is completed, read the whole disk and verify that all sectors have been erased. The processing time required for verification is about the same as the erasing process.
The state of [*] is the selection to "verify".
[ ] Stop when error
If a write error to the disk occurs in the middle, you can choose to interrupt the process or ignore it and continue. If you ignore it and continue, the number of errors is counted.
The [*] state is the selection to suspend.
[ ] Log(USBmem,FD)
After the erasing process is completed, write the processing log to the floppy disk / USB flash drive.
The status of the currently recognized FD and USB flash drive is displayed in parentheses.
The state of [*] is the selection of write log.
USBmem ・ ・ ・ USB flash drive
FD ・ ・ ・ Floppy disk
- ・ ・ ・ Writable media is not recognized. Even if you select it in this state, the log will not be written.
For FDs, there must be a 1.44M (2HD) internal / USB floppy disk drive with an MS-DOS formatted floppy disk in it.
The USB flash drive must be formatted with FAT / FAT32 / exFat.
Both must be connected and inserted when the PC starts up.
Writing is done at the end of all processing.
* If you connect a USB memory or USB-FD after booting, perform "Utility"/ "Rescan Disks/Reset Network".
About the log write destination
Search for the write destination in the following priority order.
(When booting with a USB flash drive)USB flash drive used for booting -> USB-FD-> USB flash drive ->FD
* Up to 64GB is recognized as the USB flash drive to write the log to.
* If the boot option is set to "Erase USB drives of 64G or less", the USB flash drive cannot be used as the log writing destination. Refer to "Common options" when creating a boot environment and "Erasing USB drives of 64G or less"
* If a log write error occurs because the floppy disk / USB flash drive does not exist or is not formatted and so on, an error message will be displayed at the end. Even in that case, the disk erasing process itself is completed as usual.
*After specifying the USB flash drive as the log write destination and starting the erasure process, you can remove the USB flash drive. In that case, you can either insert it again before the erasure is complete, or insert it after the message "Can't write log to USB Memory/FD" is displayed, and select "Rerty".
[ ] Log(HDD)
After the erasing process is completed, write the processing log to the erased hard disk drive.
The state of [*] is the selection of write log.
The written log file can be referenced by the following method.
* When you start the PC from the disk on which the log file is written, the log file is displayed on the screen (only when legacy/BIOS boot).
* Displayed by "Utility"/" Read HDD log" of "Boot up erase program".
* Use Windows "Utility for administrators" / "Disk log".
* Log files and small programs for starting and displaying logs are written in the first few sectors of the disk.
* If you perform a "Verify/read check" on the disk to which the log is written, only a few sectors will be counted as non-zero.
* Only the log part can be deleted by the above log file display utility.
[ ] LogNET(WIN/FTP)
After the erasing process is completed, write the processing log to the network share.
The state of [*] is the selection of write log.
This network log selection is displayed only when the network function is built in.
For details on incorporating network functions, see "Common options "/"Network" when creating a boot environment.
WIN・ ・ ・ write log to Windows share.
FTP・ ・ ・ write log to FTP server
Execute Erase
Move the cursor with the [tab] key and press [enter] with "OK" to start erasing.
Select "Cancel" to close the screen.
Confirmation in Locked/OPAL mode
If the HDD is password-locked, in OPAL mode for OPAL (self-encrypting) compatible disk, a warning will be displayed.
Log write test
A log write test is automatically performed just before the erase process begins.
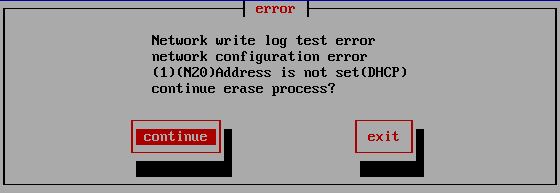
If there is an error when writing the log, an error message will be displayed like this.
Select "Continue" to continue processing with an error, or select "End" to cancel processing.
If you continue, an error will occur when writing the log after the erase process is completed.
See "Using "Network log"/ Trouble shootings" for details and how to deal with it.
Screen during erasing process
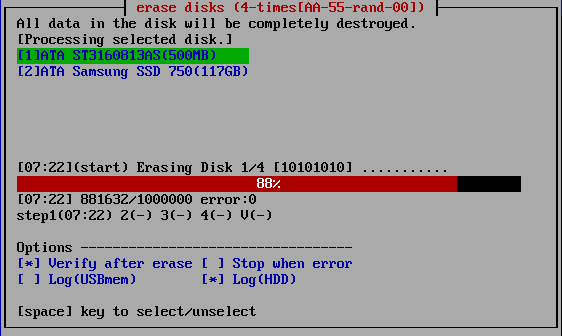
The current processing status and the start time for each step are displayed.
[hh:nn](start) ・ ・ ・ Start time of current step, content of the process
------------10%------------------------ ・ ・ ・ Percentage of progress of the current step
[hh:mm] :xxxx/xxxxx error:xxx ・ ・ ・ Current time, number of processed sectors / total number of sectors,
number of error sectors. (1 sector = 512 bytes)
step1(hh:nn) 2(-) 3(-) 4(-) V(-) ・ ・ ・ Start time for each step (V is the verification step)
| MEMO |
| The display of "Number of processed sectors" is updated in small units
up to the first 1% to confirm the start of operation, and then updated about
1% every progress. The processing speed does not decrease on the way. If there is a write / read error, retry and do a more detailed write / read check. Therefore, it may take much longer than usual. |
When interrupting processing in the middle
If you want to interrupt the process in the middle, move to another screen (ALT
+ F1-5) and exit the system from the menu, or execute "Interrupt the processing
process" on the "Utility" screen displayed by ALT +
F5.
Confirmation screen at the end of
processing
When the process is completed, the following screen will be displayed.
Use
the [tab] key to move the cursor to "Close" and press [enter] to close the
screen.
The "-" button is to prevent accidental closing. No processing is
done.

Checking the log writing result
Log FD/USBmem;- HDD:OK NET:OK(0926181439.log)
This line is the result of writing the log. "-" Indicates that writing is not
specified, "OK" indicates that writing is complete, and "X" indicates that a
writing error has occurred.
In the case of "NET", the written file name is
displayed.
* If there is a write error
error write:1234(1:100 2:200 3:34 4:900)
The number of errors for each step is displayed along with the total number of
errors.
* If there is retry processing
retry: write(1234)1:100 2:200 3:34 4:900 read(1000)
A display like this is added.
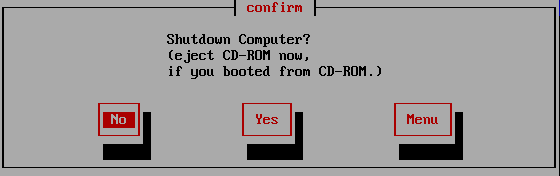
When "Auto Erase with password",
"Full-auto Erase" is specified
If you select "Close" on the confirmation screen, the following screen will
appear, and you can shut down immediately after selecting "Yes".
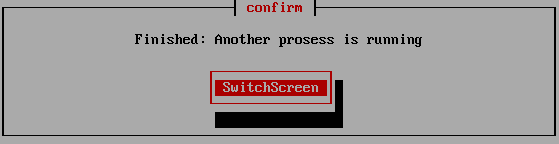
However, if processing is still being performed on another screen (displayed by
ALT + F1-5), the following screen will be displayed, and "SwitchScreen" will
automatically switch to the screen being processed.
This is to prevent a PC
with multiple disks connected from shutting down before the other disks have
been erased.
About Log file
Log file name
The log file name written to the FD / USB flash drive is determined as follows.
The file name is determined including seconds, so writing to the same media in
succession will not easily overwrite it.
[Date (day)] [hour] [minute] [second] .log
Example: Log created at
13:08:12 on June 5th-> 05130812.log
The name of the log file written to the network is as follows.
[Date (month/day)] [hour] [minute] [second] .log
Example: Log created at
13:08:12 on June 5th-> 0605130812.log
However, if "Log file name prefix" is specified in "Common options"/"Network"
when creating boot environment, another character string is added at the
beginning.
When writing to network share, the existence of the file name is checked, and if
the same file name already exists,
ex. 0605130812_1.log
A branch number
is added after the file name to prevent the file from being overwritten.
Log file sample
* The contents of the log file may differ depending on the version.
|
=== --- disk erase log ---------------------------- disk : ATA ST3160813AS (160041885696 byte/312581808 sector) rev:SD2B ser:9SY082C5 method : 4-times[AA-55-rand-00] -> verify start : 2014/02/16 14:02:39 end : 2014/02/16 16:28:34 error : write(0) read(0) verify(0) status : finished (no error) ----------------------------------------------- PC : Dell Inc. PowerEdge SC440 - XXXXXXX CPU : Intel(R) Pentium(R) D CPU 2.80GHz MEMORY : 2071552 kB ----------------------------------------------- GreenPepper PRO ver.4.2.0 (c)kirala21 ----------------------------------------------- === 92ae1655be5a5b95977863ac87c637a5 |
* If there is write error,
error: write(1234)1:100 2:200 3:34 4:900
The total number of errors, as well as the number of errors for each step, is displayed.
* When there is retry processing
retry: write(1234)1:100 2:200 3:34 4:900 read(1000)
A display like this is added.
About log file Checksum
As shown above, the "checksum" character string "92ae1655be5a5b95977863ac87c637a5" (example) is added at the end.
This is to check that the content of the report is output by "Green Pepper PRO" and that no single character has been changed since then.
To check the checksum, use Windows "Utilities for Administrator"/"check log".
* Please handle the log file in units of the contents between "===" (including itself) and the checksum character string on the next line.
* The checksum of the above sample is incorrect (security reason).
About the number of erasures
*The following write values can be changed. See "Common options"/"Erasure Pattern".
*For SSD drives, TRIM process is performed before the first erasure step when 2-4 times erasure is selected.
1-Time
The process of filling the entire disk with "zero" (00: hexadecimal number) is performed.
1st time: Write 00 (hexary) / 00000000 (binary)
2-Times
Perform the erasing process twice as shown below. Processing time is doubled. It is a method that makes reading by residual magnetism more difficult by using random values and zero clear without spending much processing time.
1st time: Write a random value
2nd time: Write 00 (hexary) / 00000000 (binary)
3-Times
Perform the erasing process three times as follows. Processing time is tripled. It is a method that conforms to the US Army compliant method (AR380-19). It is a method that shortens the processing time and makes reading by residual magnetism even more difficult by random value, FF value, and zero clear (inversion of each bit).
1st time: Write a random value
2nd time: Write FF (hexary number) / 11111111 (binary number)
3rd time: Write 00 (hexary) / 00000000 (binary)
4-Times
Erase the disk using a US Department of Defense standard compliant method (DoD5220.22-M). Use this if you need a higher level of security where residual magnetism is an issue. The processing time is 4 times longer.
1st time: Write AA (hexary) / 10101010 (binary)
2nd time: Write 55 (hex complement, AA complement) / 01010101 (binary)
3rd time: Write a random value
4th time: Write 00 (hexary) / 00000000 (binary)
* In order to comply with (DoD5220.22-M), perform the verification process by "Verify after erase".
About the number of errors
The number of errors is counted for each of write, read, and verify. The unit is 1 sector = 512 bytes.
* Even if the physical sector is 4096 bytes, the count is in 512-byte units.
| WRITE error | This is an error that occurred when writing. It is possible that this number x 512 bytes was not written (not erased) correctly. |
| READ error | Only when read verification is performed. This is the number of cases that could not be read. The contents of the disk are unknown for this number x 512 bytes. Even if a WRITE error has not occurred, READ may not be possible and a READ error may occur. This is a phenomenon that tends to occur on a failed disk. |
| VERIFY error | Only when read verification is performed. The number of sectors where the read data had a non-zero value (there was a difference when comparing with 0 sector). The part of the READ error is not included in the VERIFY error. Even if a WRITE error has not occurred, a VERIFY error may occur if the writing to the disk surface is not actually performed correctly. This is a phenomenon that tends to occur on a failed disk. |
About retry processing
If an error occurs in the write process or read process, retry is performed.
The count of the number of times of retry is displayed in the log file
"retry" part.
Even if "retry" has a count, it will not be counted as an
error if it is processed normally at the time of retry.