|
| <- prev |
| Operation of "Boot up Erase Program"-> Verify/read check |
Verify/read check
If you select "Verify/read check", the following screen will be displayed.
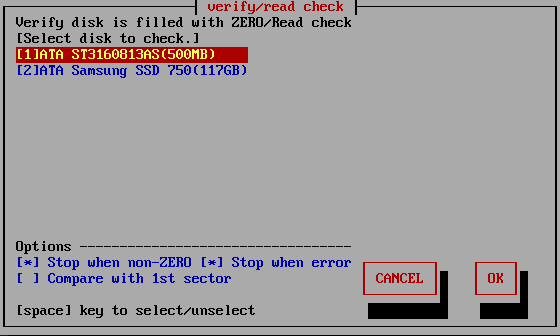
List of connected disks
The model number, capacity, firmware revision, and disk serial number of the disk recognized by the "Green Pepper PRO" system are listed.
* For a single disk, it is a physical disk unit, and for a RAID configuration, it is a logical disk unit.
* For RAID disk or others, revision, and serial number may not be displayed.
As shown below, if the message "NO supported disk" is displayed even though the disk is connected, the disk is not recognized.
* There may be a disk failure.

| MEMO *** If the disk does not appear in the list |
|
Check the disk hardware ・ First, check that the disk is recognized on the BIOS screen of the PC. To display the BIOS screen, see "Setting the boot environment on BIOS/UEFI". Information about the disk is displayed in this screen. ・ If Windows works, make sure that Windows recognizes the disk. Check if it is supported by "Green Pepper PRO" ・ If the interface is not supported by "Green Pepper PRO", the disk will not be displayed. ・ Please let us know the contents of "Disk Interface" displayed in "Show current disk status" * You can save the screen image to the FD / USB flash drive /Net share with "Utility" / "Save screenshot (FD / USBmem/Net)" displayed by ALT + F5. Or * Use "Write hardware information to FD / USBmem / Net" in "Utility" displayed by ALT + F5, save the PC information to USB flash drive / FD, and send the file (HWINFO.TXT) to us. |
| MEMO |
|
The beginning of the line is [1] (parentheses) are ATA (IDE, SATA) disks. <3> (parentheses) are SAS / SCSI / RAID connections. ! 1 xxxxxxxx Those with "!" Displayed are IDE disk interfaces that do not support high-speed mode (DMA) in the hardware / driver. The access is low-speed mode (PIO mode), and the processing speed is very slow. |
Select the disk using the [up] and [down] keys in the list, and press [enter].
* Multiple processes cannot be performed on the same disk on different screens.
Setting "Options"
* You can change the selection / deselection by pressing the [space] key while the cursor is on it. [ ]
[ ] Stop when non-ZERO
The disk is read sequentially, and if there is a non-zero location, the process is interrupted. If not interrupted, it will be counted up and displayed as "non-zero".
The [*] state is the selection to interrupt.
However, when "Compare with 1st sector" is selected in the following options, it is compared with the contents of the first sector instead of zero, and if there is a difference, the interruption / non-zero count up is performed.
[ ] Stop when error
If a read error to the disk occurs in the middle, you can choose to interrupt the process or ignore it and continue. If you ignore it and continue, the number of errors is counted.
The [*] state is the selection to suspend.
[ ] Compare with 1st sector
Checks if the contents of the disc are the same as the contents of the first sector.
This is used for read validation when a particular pattern is written. "Enhanced Secure Erase" may write non-zero values.
First, the first sector (512 bytes) is read, and the subsequent sectors are compared in units of 512 bytes.
The count displayed as "non-zero" is the number of sectors different from the first sector.
The [*] state is the selection to compare with 1st sector.
Execute check
Move the cursor with the [tab] key and press [enter] with "OK" to start checking.
Select "Cancel" to close the screen.
Confirmation in Locked/OPAL mode
If the HDD is password-locked, in OPAL mode for OPAL (self-encrypting) compatible disk, a warning will be displayed.
Display during checking process
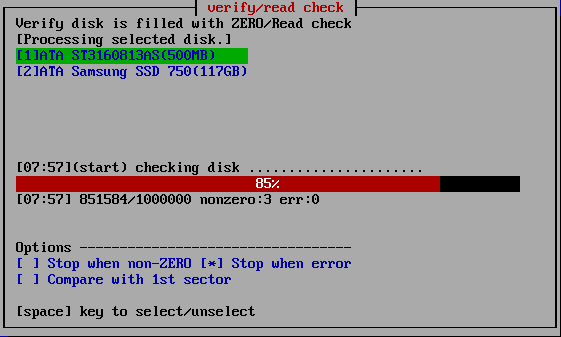
The current processing status and the start time are displayed.
[hh:nn](start) ・ ・ ・ Start time of current step, content of the proces
------------10%------------------------ ・ ・ ・ Percentage of progress of the
current step
[hh:mm] xxxxx/xxxx nonzero:xxxx err:xxx ・ ・ ・ Current time, number of processed
sectors / total number of sectors,
number of non-zero sectors, error sectors. (1 sector = 512 bytes )
| MEMO |
| The display of "Number of processed sectors" is updated in small units
up to the first 1% to confirm the start of operation, and then updated about
1% every progress. The processing speed does not decrease on the way. If there is a write / read error, retry and do a more detailed write / read check. Therefore, it may take much longer than usual. |
When interrupting processing in the middle
If you want to interrupt the process in the middle, move to another screen (ALT
+ F1-5) and exit the system from the menu, or execute "Interrupt the processing
process" on the "Utility" screen displayed by ALT +
F5.
Confirmation screen at the end of
processing
When the process is completed, the following screen will be displayed.
Use
the [tab] key to move the cursor to "Close" and press [enter] to close the
screen.
The "-" button is to prevent accidental closing. No processing is
done.
About the number of errors
The number of errors is counted for each of write, read, and verify. The unit
is 1 sector = 512 bytes.
* Even if the physical sector is 4096 bytes, the
count is in 512-byte units.
| READ error |
This is the
number of cases that could not be read. The contents of the disk are unknown for this number x 512 bytes. |
| VERIFY error |
The number of
sectors where the read data had a non-zero value (there was a difference
when comparing with 0 sector). The part of the READ error is not included in the VERIFY error. |