|
| <- prev |
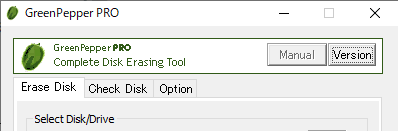
| Operation of "Windows Erase program"-> Erase disk drives |
Erase disk drives
"Erase Disk" erases the hard disk, floppy disk, memory card, etc. connected
to the Windows PC.
When erasing with "erase Disk"(not "erase Drive"), all
the contents of the disk including the format data will be erased.
*"Disk" refers to a whole physical disk unit.
*"Drive"
refers to a
partition within a disk drive. Usually a drive letter "A"-"Z" is assigned.
* If you format the disk again, you can use the disk again.
* Drives / disks accessed by some programs, including background services,
cannot be erased.
![]()
*
Drives used in Windows systems, such as C
drive and disks containing C drive partition, cannot be erased.
* Use the "Boot up Erase
Program" or run on WIndowsPE environment for Windows system drive, other drives used by Windows background
process.
![]()
![]()
*It is
possible to erase all drives, including the Windows system drive.
![]()
Select Disk/Drive

Select whether to erase etc. on a drive (C,D,..., a partition) or on a whole
physical disk.
![]()
erase Drive
In Windows, drive letters such as A, C, D, etc. are basically assigned to each
disk (whole physical disk) for removable disks (such as floppy disks ,USB flash
drives), and to each partition for hard disk drives.
If you want to erase this
drive unit, select "erase Drive".
* on WindowsPE, you cannot select "erase Drive"
![]()
erase Disk
For hard disks, etc. (include removable drive), you can erase entire disk
regardless of the partition state. In that case, all data on the disk, including
partition information, will be erased.
* For a single disk, it is a
physical disk unit, and for a RAID configuration, it is a logical disk unit.
Disks with no drive letter assigned or unformatted disks can also be
selected.
| MEMO |
| When erasing in disk units, it is necessary that all the drives (E, F,
G, etc.) contained in the disk are not accessed by any process at all. Even
if the folder on that drive is displayed in Explorer, it cannot be
processed. At the start of the erase process, all the allocated drives will be separated from Windows, so those drives will not be visible from Explorer. |
Select Drive/Disk to erase
After specifying "erase Drive" or "erase Disk", select the drive/disk to erase.
Disk information
Choose "erase Disk" and a select disk to display information about the disk.
* Not displayed when "erase Drive".

If the information can be obtained, the following information will be displayed.
rev: Disk firmware revision
serial: Disk serial number reallocated
sector: Number of sectors that have been reallocated
HPA: Host protected
area, Setting information
and other information.
* For "Reallocated sector" and "HPA", see "Points
to consider about erasing method".
Disk Detail information
Choose "erase Disk", select a disk, and then click the "Detail" button to
display detailed disk information.
* Not displayed when "erase Drive".
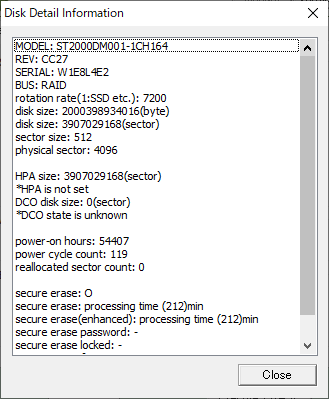
What is displayed
* Some items may not be displayed depending on the disk, disk interface.
* For "Reallocated sector", "HPA", "DCO", "Secure Erase",, see "Points
to consider about erasing method".
| MODEL | Model name |
| REV | Firmware revision |
| SERIAL | Serial No |
| BUS | The name of the BUS to which the disk is connected. SCSI, ATA, USB, RAID, iSCSI, SAS, etc. |
| rotation rate | The rotation rate of the disk. Displayed as "1" for SSDs, etc. |
| disk size | Disk size in bytes |
| disk size | Disk size in sectors (512 bytes) |
| sector size | Logical sector size |
| physical sector | Physical sector size |
| HPA size (ATA drive) |
Disk size including areas other than
those protected as HostProtected Area. If it is the same as "disk size", it means that HPA is not set. "*HPA is set" HPA is set. The "disk size" is smaller than the physical disk size, and there are areas that are normally inaccessible. "*HPA is not set" HPA is not set and "disk size" is the same as the physical disk size. However, if DCO/AMA is set, the "disk size" will be smaller than the physical disk size. "*HPA state is unknown The HPA status cannot be obtained and the setting status is unknown. "*HPA is not supported" HPA is not supported. |
| DCO disk size (ATA drive) |
If the disk size is set (reduced) in DeviceConfigurationOverlay, the DCO disk size is the actual physical disk size. "*DCO is set" DCO is set. The "disk size" is smaller than the physical disk size, and there are areas that are normally inaccessible. "*DCO is not set" DCO is not set and "disk size" is the same as the physical disk size. However, if HPA/AMA is set, the "disk size" will be smaller than the physical disk size. "*DCO state is unknown" The DCO status cannot be obtained and the setting status is unknown. "*DCO is not supported" DCO is not supported. |
| AMA disk size (ATA drive) |
If the disk size is set (reduced) in Accessible Max
Address (AMA), the disk size is smaller then the actual physical disk size. "*AMA is set" AMA is set. The "disk size" is smaller than the physical disk size, and there are areas that are normally inaccessible. "*AMA is not set" AMA is not set and "disk size" is the same as the physical disk size. However, if HPA/DCO is set, the "disk size" will be smaller than the physical disk size. "*AMA state is unknown" The AMA status cannot be obtained and the setting status is unknown. "*AMA is not supported" AMA is not supported. |
| power-on hours | Disk usage time (in hours) recorded on the disk. |
| power cycle count | The number of times the disk is turned on, recorded on the disk |
| reallocated sector count (ATA) |
Number of reallocated bad sectors. |
| media error (NVMe) | Media errors count of the drive. |
| percentage used (NVMe) |
Used (consumed) percentage of the drive. |
| available spare (NVMe) |
Available spare (for replacement of error media) percentage. |
| spare threshold (NVMe) |
Healthy threshold for available spares. |
| secure erase | Support for Secure erase and processing time. |
| secure erase(enhanced) | Support for enhanced secure erasure and processing time. |
| secure erase password | Whether the HDD password is set. "O": Set "-": Not set, unknown |
| secure erase locked | Whether the HDD is locked. "O": Locked state "-": Not set, unknown |
| secure erase frozen | Whether the HDD is frozen. "O": Frozen state "-": Not set, unknown |
| sanitize | Support for Sanitize |
| sanitize OverWrite | Supports erasure by "OverWrite" processing in Sanitize. |
| sanitize BlockErase | Supports erasure by "BlockErase" processing in Sanitize. |
| sanitize CryptoErase | Supports erasure by "CryptoErase" processing in Sanitize. |
| OPAL supported | "O": if the disk supports OPAL (self-encryption). If it is not supported, it will not be displayed. Ver: OPAL version mode: Display of OPAL mode or ATA,NVMe mode lock: "O" if locked in OPAL mode, "-" if not locked |
Additional information for "Report"
Enter the information to be added in the end "Report" displayed after the
processing is completed.
It is convenient to use it to record the name of
the device, ID number, name of the person in charge, etc.
The characters
entered here will be included in the checksum of the report and will be checked
for tampering with the report.
* It is not added to the log file.
Example: "Manufacturing Depart. Nomura"

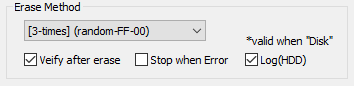
Erase method, options
Select the erasing method and processing option.
* Secure erase
is not possible with "Windows Erase Program". Please use the "Boot
up Erase Program".
* The following write values can be changed.
See "Common options"/"Erasure Pattern".
1-Time
The process of filling the entire disk with "zero" (00: hexadecimal number)
is performed.
1st time: Write 00 (hexary) / 00000000 (binary)
2-Times
Perform the erasing process twice as shown below. Processing time is doubled.
It is a method that makes reading by residual magnetism more difficult by
using random values and zero clear without spending much processing time.
1st time: Write a random value
2nd time: Write 00 (hexary) / 00000000
(binary)
3-Times
Perform the erasing process three times as follows. Processing time is
tripled. It is a method that conforms to the US Army compliant method
(AR380-19). It is a method that shortens the processing time and makes reading
by residual magnetism even more difficult by random value, FF value, and zero
clear (inversion of each bit).
1st time: Write a random value
2nd
time: Write FF (hexary number) / 11111111 (binary number)
3rd time: Write
00 (hexary) / 00000000 (binary)
4-Times
Erase the disk using a US Department of Defense standard compliant method
(DoD5220.22-M). Use this if you need a higher level of security where residual
magnetism is an issue. The processing time is 4 times longer.
1st
time: Write AA (hexary) / 10101010 (binary)
2nd time: Write 55 (hex
complement, AA complement) / 01010101 (binary)
3rd time: Write a random
value
4th time: Write 00 (hexary) / 00000000 (binary)
* In order to comply with (DoD5220.22-M), perform
the verification process by "Verify after erase".
![]()
For
SSD drives, TRIM process is performed before the first erasure step when 2-4
times erasure is selected.
![]()
Verify after erase
After the erasing process is completed, read the whole disk and verify that
all sectors have been erased. The processing time required for verification is
about the same as the erasing process.
Stop when error
If a write error to the disk occurs in the middle, you can choose to interrupt
the process or ignore it and continue. If you ignore it and continue, the
number of errors is counted.
Log(HDD)
After the erasing process is completed, write the processing log to the erased
disk drive.
* This process is valid only when erasing in "erase
Disk".
The written log file can be referenced by the following method.
* When
you start the PC from the disk on which the log file is written, the log file
is displayed on the screen (only when legacy/BIOS boot).
* Displayed by "Utility"/"
Read HDD log" of "Boot up erase program".
* Use Windows "Utility for
administrators" / "Disk log".
* Log files and small programs for starting and displaying logs are written in
the first few sectors of the disk.
* If you perform a "Verify/read check"
on the disk to which the log is written, only a few sectors will be counted as
non-zero.
* Only the log part can be deleted by the above log file display
utility.
![]()
Log(Removable)
After the erasure process is complete, write the process log to a removable
drive such as FD or USB flash drive.
The removable drive targeted for log
writing is a floppy disk drive or a removable drive (USB flash drive, etc.) of
128 Gbyte or less.
The file name will
be [month][day][hour][minute][second].log based on the current time.
Log(NET)
After the erasure process is complete, the process log is written to a Windows
shared folder on the network.
To enable it, use the "Startup Environment
Creation Tool" and "Create WindowsPE
Configuration File" to create "config.gp4" with network settings enabled,
and save it in the same folder as "gppro4.exe".
By default, the file
name is [month][day][hour][minute][second].log based on the current time.
It is also possible to add fixed values or user input values to the beginning
of the file name.
For more information, see "Common
options" of "Startup environment creatin tool".
![]()
Confirm
It is provided for confirmation so that it will not work even if you
accidentally press the "execute ERASE" button.
Please enter "YES" ("yes" is
also possible).
execute ERASE
Press this button to start the process.
Errors that can occur at the start
Disk is locked (Secure
Locked)
Since the HDD password is set on the disk, read / write processing cannot be
performed.
To cancel, use "Remove HDD Password" in "Boot up Erase Program"/"Utility".
Cannot lock drive/Cannot unmount drive
Cannot open drive
The specified drive / disk cannot be opened. Lock processing for exclusive use
is not possible.
It is displayed when the program or file on the drive /
disk is used by any process, including the case where the folder is displayed in
Explorer.
For removable media such as USB flash drive, try removing it once. Check if the
files are not used on the hard disk, including the service program in the
background.
| MEMO |
|
If you get an error such as "Cannot lock", it is likely that one of the
processes is accessing the file on that drive. It may be an antivirus or an
explorer or other background process. To find out which process is accessing it, it is convenient to use "openfiles.exe" which comes standard with Windows. 1. Open "Command Prompt" with administrator privileges 2. execute ----------------------------------------------------------- openfiles /local on ----------------------------------------------------------- To enable openfiles.exe to monitor the file list --- You need to restart your PC here to enable it. 3. After rebooting, open "Command Prompt" again with administrator privileges. 4. execute ----------------------------------------------------------- openfiles /query | findstr -i "E:" ----------------------------------------------------------- * Replace "E" with the drive name you want to check. A list of processes using files on the specified drive will be displayed. 5. If you do not use openfiles any more ----------------------------------------------------------- openfiles /local off ----------------------------------------------------------- To disable monitoring. |
Display during erasure
The following is displayed while the erase process is being executed.
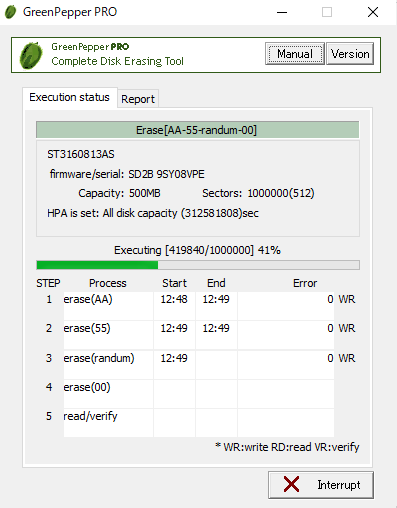
You can check the start / end time of each erase and verification step, and
the number of errors for each step.
WR: count of WRITE errors
RD: count of READ errors
VR: count of VERIFY errors
About the count of errors
The number of errors is counted for each of write, read, and verify.
The
unit is the number of sectors per sector = 512 bytes.
| WRITE error | This is an error that occurred when writing. It is possible that this number x 512 bytes was not written (not erased) correctly. |
| READ error | Only when read verification is performed. This is the number of cases that could not be read. The contents of the disk are unknown for this number x 512 bytes. Even if a WRITE error has not occurred, READ may not be possible and a READ error may occur. This is a phenomenon that tends to occur on a failed disk. |
| VERIFY error | Only when read verification is performed. The number of sectors where the read data had a non-zero value. The part of the READ error is not included in the VERIFY error. Even if a WRITE error has not occurred, a VERIFY error may occur if the writing to the disk surface is not actually performed correctly. This is a phenomenon that tends to occur on a failed disk. |
Interrupt
You can interrupt the process with the "Interrupt" button at the bottom right.
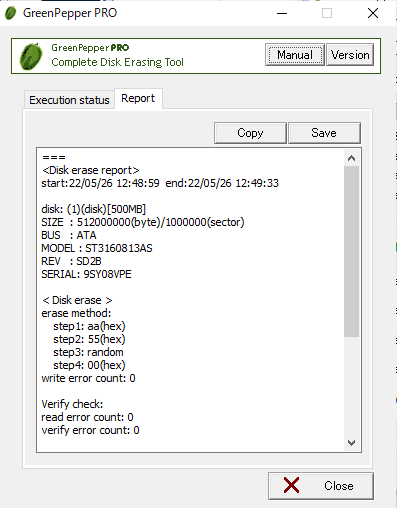
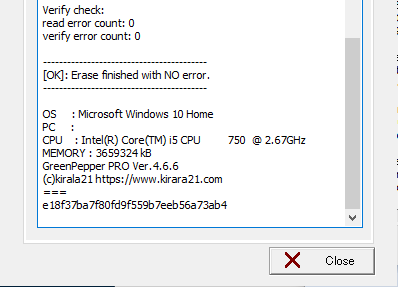
End Report
When the process is completed, the following "End Report" will be
displayed.
Copy allows you to copy the content and paste it into another application
(word processor, notepad, etc.).
"Save" allows you to save the contents to a
file.
* You can switch between "Execution status" and end "Report" until you
finish with the "Close" button.
About the checksum of the Report
===
<Disk erase report>
・ ・ ・
・ ・ ・
(c)kirala21 http://www.kirala21.com
===
5690773027bfdc37a502d404eba0eacc
As shown above, the "checksum" character string
"5690773027bfdc37a502d404eba0eacc" (example) is added at the end.
This is
to check that the content of the report is output by "Green Pepper PRO" and
that no single character has been changed since then.
To check the
checksum, use Windows "Utilities for
Administrator"/"check log".
* Please handle the
Report text in units
of the contents between "===" (including itself) and the checksum character
string on the next line.
* The checksum of the above sample is incorrect
(security reason).
Close
Click the "Close" button to close the Report screen.