|
| <- prev |
| Operation of "Boot up Erase Program"-> Basic Operation |
Basic operation of "Bootup Erase program"
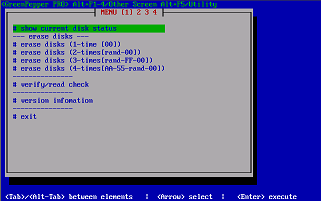
Menu screen
If you start the "Bootup Erase program" from the bootable CD, USB flash
drive, or hard disk, the following menu will be displayed.
* Depending on the settings, the password input screen will be displayed before
the menu is displayed.
* You can change the menu contents, such as limiting
them to specific ones, by setting.
See "Common
options"
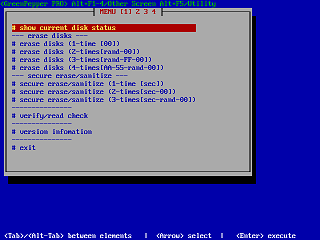
Normal menu screen
When a disk capable of Secure erase / Sanitize processing is
connected,
the selection menu of "---- Secure erase / Sanitize ---" is
automatically displayed as shown below.
Key operation
Move choices: Arrow keys
Move between input items: [tab] / [alt] + [tab]
keys
Select / execute choice: [enter] key
Check / uncheck check items:
[space] key
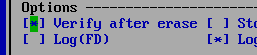
Cursor position
Check the current position of the cursor as follows.
| cursor is on "OK" button | no cursor on "OK" button |
 |
 |
| cursor is on "Verify after erase" | no cursor on "Verify after erase" |
 |
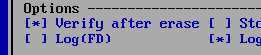 |
Switch to another screen
There are a total of 5 separate screens, including the screen you are currently
viewing, and you can perform different processes in parallel. By erasing
multiple disks in parallel, the overall processing time can be shortened.
Use the ALT + F1, ALT + F2, ALT + F3, ALT + F4, and ALT + F5 keys to switch
screens.
* Multiple erases and check processes (such as checking on a
separate screen while erasing) cannot be performed on the same disk.
Outline of menu contents
* Menu contents can be customized in various ways, and the contents vary
depending on the setting status.
* For customizing the menu screen, refer to
"Common options"
show current disk status
A list of disks currently connected (recognized) to the system is displayed.
You can also get detailed information about the disk, PC, and disk interface.
erase disks (1-time [00])
erase disks (2-times[rand-00])
erase disks (3-times[rand-FF-00])
erase disks (4-times[AA-55-rand-00])
This process erases the contents of the specified disk.
Select
the required number of erases and perform the erase.
secure erase/sanitize (1-time [sec])
secure erase/sanitize (2-times[sec-00])
secure erase/sanitize (3-times[sec-rand-00])
This is the process of performing Secure Erase / Sanitize on the
specified disk.
Except for the [sec] step, the procedure is the same as for
normal erasing.
When a compatible disk is not connected, "*** NO supported
disk ***" is displayed and the menu cannot be selected.
* When booting from the product CD-ROM, the "Secure Erase / Sanitize" menu is
displayed only when a disk that can be execute secure erase / sanitize is
connected.
Conditions for displaying the "Secure Erase /
Sanitize" menu
・There is a disk that supports Secure Erase and is not
"Frozen" state.
・There is a disk that supports Sanitize.
If you want to force the display "Secure erase/Sanitize" menu, please boot
with secure boot option.
* "gps" for BIOS boot, "Enable Secure Erase" for
UEFI boot. See "Boot from CD / USB flash drive".
It is possible to switch between display / non-display and automatic display by
setting in "Common options".
verify/read check
Checks if the disk has been erased and checks for read errors in the entire
disk.
version information
Display version information.
exit
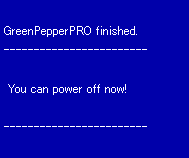
Shut down the system and turn off the power.
System shutdown.
Select "Exit" from the menu and press [enter].
On the screen below,
select [Yes] and press [enter].
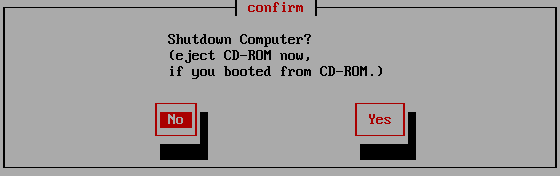
Many PCs will turn off automatically after this.
Therefore, if you are
booting from the CD-ROM, it is convenient to remove the CD at this timing.
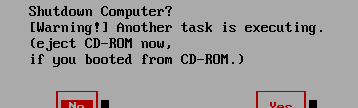
If this message is displayed, some processing is being performed on another
screen (switched with ALT + F1, ALT + F2, ALT + F3, ALT + F4).
Please switch
screens to check. It is also possible to forcibly terminate as it is.
If the power does not turn off automatically
After selecting Exit, you may see some messages, including the following:


In such a case, or if the power does not turn off automatically, etc.,
after
the following screen is displayed, press the power button (may be a long press)
to turn off the power.