|
| <- prev |
| Operation of "Windows Erase program"-> Building WindowsPE boot environment |
How to run "gppro4.exe" in Windows PE environment using "System Repair Disc" (easy way)
If you want to create a WindowsPE execution environment that boots from a CD/USB
flash drive and automatically launches the erase program, you need to use the
method described in "Building WindowsPE boot environment" below.
However, if
you want to start the erase program and erase manually in a Windows PE
environment, you can do it easily by following the steps below.
Create "System Repair disc" on Windows10/11
This can be done from "Control Panel" -> "Backup and Restore".
Please see the Windows manual for detailed instructions.
Boot your PC with the "System Repair Disc"
・After booting with the "System Repair Disc", select "Command
Prompt" from the screen.
・Replace the "System Repair disc" with a CD
containing the Windows erasure program "gppro4.exe", or insert a USB flash
drive containing "gppro4.exe".
・Run "gppro4.exe" from the CD or USB flash
drive at "Command Prompt".
* Normally, the drive assignments is
as shown below. However, depending on the system.
X: Windows
system deployed in memory
C: Internal disk drive
D:,E:,F: etc. CD drives, USB flash drives, etc.
Example:
If
the USB flash is the D: drive and "gppro4.exe" is in the root folder of the
USB flash drive, enter the following to start it.
D:\gppro4.exe
Building WindowsPE boot environment
In order to use the "Windows Erase Program" (gppro4.exe) in a WindowsPE
environment, you must create the WindowsPE environment yourself.
Below are
the steps for the latest version (10.0.226.21.1) as of August 2023.
For
other versions, the steps may be different.
Note on WindowsPE
WindowsPE is an OS that is highly compatible with Windows and is
provided free of charge by Microsoft, but it is for temporary use, including
disk erasure.
Therefore, if continuous use exceeds
72 hours, it is designed to automatically stop. Please be careful when
erasing large size disks.
Please see Microsoft's website for details.
Download/install WindowsPE environment
Download
Download "Windows ADK for WindowsXX" and "Windows PE Add-on" from the
Microsoft site.
Install ADK, WindowsPE Add-on
When installing "Windows ADK", it is necessary to enable [Deployment
tool] feature.
*Even if all other options are OFF, it will still
work for this purpose only.
After installing "Windows ADK", install
"WindowsPE Add-on".
Creating a base WinPE image
Run "Deployment and Imaging Tools Environment"
From start menu, find [Windows Kits]->[Deployment and Imaging Tools
Environment], run it as Administrator.
Create base WinPE image
At the [Deployment and Imaging Tools Environment] command prompt, run the
following command.
The files required to run WindowsPE will be created
under the specified folder.
copype amd64 C:\WinPE_amd64 |
amd64: Specifies the construction of a 64-bit environment.
Windows PE
equivalent to Windows 11 only provides a 64-bit environment.
*When
building in a 32-bit environment with an earlier version, it will be "x86".
"C:\WinPE_amd64": Created under this folder. Any folder can be
specified.
*This folder name will be used in the
following explanation.
Configure WinPE image and embed the program
Run "Deployment and Imaging Tools Environment"
From start menu, find [Windows Kits]->[Deployment and Imaging Tools
Environment], run it as Administrator.
Mounting WinPE boot disk image file
At the [Deployment and Imaging Tools Environment] command prompt, run the
following command.
By mounting, the contents of the boot disk image file
[boot.wim] can be accessed under the [mount] folder.
|
Dism /Mount-Image /ImageFile:"C:\WinPE_amd64\media\sources\boot.wim" /index:1 /MountDir:"C:\WinPE_amd64\mount" |
Adding required packages and drivers
At the [Deployment and Imaging Tools Environment] command prompt, run the
following command.
Add the necessary packages to run "gppro4.exe".
*In the standard state, disk drivers and network drivers for general
desktop and notebook PCs are included, but if you need additional drivers for
servers etc., install them here.
required package
・WMI
WinPE-WMI.cab
|
Dism /image:C:\winPE_amd64\mount /add-package /packagepath:"C:\Program Files (x86)\Windows Kits\10\Assessment and Deployment Kit\Windows Preinstallation Environment\amd64\WinPE_OCs\WinPE-WMI.cab" |
If you need to add drivers.
|
Dism /Add-Driver /Image:"C:\WinPE_amd64\mount" /Driver:"C:\SampleDriver\driver.inf" |
Time zone and keyboard settings
At the [Deployment and Imaging Tools Environment] command prompt, run the
following command.
|
Dism /image:C:\winPE_amd64J\mount /Set-Timezone:<Time zone name> Dism /image:C:\winPE_amd64J\mount /Set-InputLocale:<input_locale>:<keyboard_layout> |
You can check the current timezone and locale:keyboard settings using the following command.
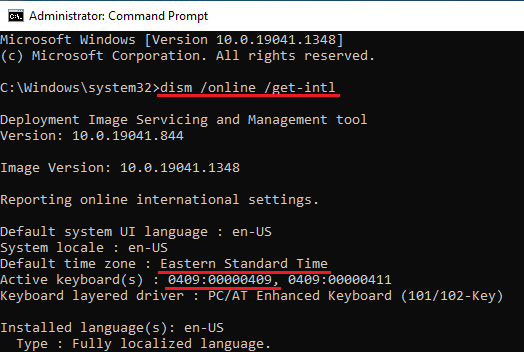
| Dism /Image:"C:\WinPE_amd64\mount" /Get-intl |
The timezone and locale:keyboard_layout values that should be set can be obtained from the PC currently used for configuration using the following method.
*"/online" indicates the currently running Windows,
and "/image" indicates the specified Windows image file.
If you want to set it up like in the example above, run the following command.
|
Dism /image:C:\winPE_amd64\mount /Set-Timezone:"Eastern Standard Time" Dism /image:C:\winPE_amd64\mount /Set-InputLocale:0409:00000409 |
Embedding "gppro4.exe"
Perform the steps below with the boot disk image file [boot.wim] mounted.
"C:\WinPE_amd64\mount\program files"
Copy the following to this
folder. (Copy with regular Windows Explorer)
gppro4.exe : "Windows
Erase program". For 64bit WindowsPE, use the
64bit version "gppro4.exe".
config.gp4 : Configuration
file created using the "Startup Environment Creation Tool"/"Creating
WindowsPE configuration File". (Copy required only if used)
license.gp4 : License file required when using "gppro4.exe"
Settings for automatic execution of the program
("gppro4.exe")
Perform the steps below with the boot disk image file [boot.wim] mounted.
"C:\WinPE_amd64\mount\Windows\System32"
Create a text file
named "Winpeshl.ini" in this folder.
Write the following as the contents
of the file.
*Please be careful not to add ".txt" etc. to the end of the
file name.
| [LaunchApps] startnet.cmd "%systemdrive%\Program Files\gppro4.exe" wpeutil shutdown |
At the [Deployment and Imaging Tools Environment] command prompt, run the following command.
|
Dism /unmount-image /mountdir:C:\WinPE_amd64\mount /commit |
If you change the contents of the boot disk image file [boot.wim], be sure to
unmount and close the boot disk image file.
Before unmounting, please
make sure that no other program is accessing the
folder under "mount".
It is also not possible to open the folder in
Explorer.
If an error occurs when unmounting, please do the following command.
In
that case, mount it again and check the contents.
Dism /unmount-image
/mountdir:C:\WinPE_amd64\mount /discard
Creating a bootable CD image file, configuring a
bootable USB flash drive
CD Image file
At the [Deployment and Imaging Tools Environment] command prompt, run the
following command.
*WinPE boot disk image file must be UNmounted.
|
MakeWinPEMedia /ISO C:\WinPE_amd64 "C:\anyfolder\WinPE_amd64.iso" |
Here, "c:\anyfolder\WinPE_amd64.iso" is the output CD image file name. Please
specify any file.
Create a CD-R from the created ISO file. See "How to
create a CD from an image file".
USB flash drive
At the [Deployment and Imaging Tools Environment] command prompt, run the
following command.
*WinPE boot disk image file must be UNmounted.
|
MakeWinPEMedia /UFD C:\WinPE_amd64 X: |
Here, replace "X:" with the drive letter of the USB flash drive to be written.