|
| <- prev |
| Operation of "Boot up Erase Program"-> Secure erase/Sanitize |
For more information on Secure Erase/Sanitize, see "About Secure Erase/Sanitize".
Secure erase/Sanitize
Secure erase / sanitize menu display
In the following cases, the Secure Erase / Sanitize Erase process menu is displayed.
・ When booting with a normal CD / USB flash drive and a disk that supports Secure erase and is not frozen or a disk that supports Sanitize is connected.
・ When Secure erase/Sanitize is enabled in the boot option.
When booting with Legacy/BIOS, enter the "gps" options to boot.
When booting with UEFI, press the [ESC] key and select
"---other boot options"-> "b. Enable Secure Erase"
from the option menu screen that appears. (See "Boot from CD/USB flash drive")
・ When the "Secure erase / Sanitize menu" is set to "Always show" on a customized CD or USB flash drive (see "Common options")
When the menu option including Secure erase is selected and there is an disk that supports Secure erase, the menu is displayed as shown below, and Secure erase can be selected.
When the Secure erase / Sanitize menu is displayed
If the Secure erase/Sanitize menu display is specified (in the boot options/"Always show" customization) and there is no compatible disk, the following is displayed and Secure erase/Sanitize cannot be selected.

| MEMO |
|
During "Secure Erase" (ATA disk) processing on one screen, erasing ATA discs
(both normal erase and secure erase) on other screens, checking ATA disks,
etc. does not work until "Secure Erase" is completed. (the screen stops and
starts moving after the secure erase is completed). If it is "sanitize" (ATA disk) processing, it can be operated on other screens. In particular, you need to be careful in the case of automatic erasing processing on a PC to which multiple HDDs / SSDs are connected. |
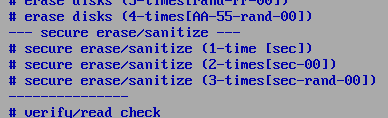
Secure erase/Sanitize (1time - 3times)
If you select "SecureErase/Sanitize" (1time-3times), the following screen
will be displayed.
List of connected disks
The model number, capacity, firmware revision,
and disk serial number of the disk recognized by the "Green Pepper PRO" system
are listed.
However, unlike the "Erase Disk" screen, this screen only
displays disks that support Secure Erase / Sanitize.
"NO supported disk"
If the message "No supported disk" is displayed as shown below, it means that
the disk that supports Secure erase / Sanitize cannot be recognized.
If it
is displayed in "Show current disk status" but not displayed on this screen, it
means that the disk or interface does not support Secure erase / Sanitize
processing.

For example, when connecting a disk via USB, even if the disk itself supports
Secure erase / Sanitize, it cannot be process Secure erase, because many USB
interfaces do not pass through Secure erase command.
In many cases, it can
be processed by connecting IDE / SATA directly to the motherboard interface of
the PC.
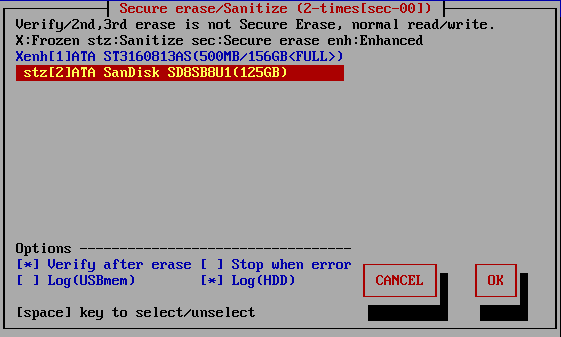
Display of Secure erase/Sanitize, Frozen
If the disk supports Sanitize, it will be displayed as "stz". (Sanitize is
displayed with priority)
If Sanitize is not supported and Secure erase is
supported, "sec" or "enh" is displayed.
"sec" is a Secure erase display that
does not support enhanced processing, and "enh" is a display that supports
Enhanced Secure erase.
Those with an "X" at the beginning of the line are
"Frozen" disks. In this state, Secure erase processing cannot be performed.
For the state of the disk for Secure erase / Sanitize, see "About
Secure erase / Sanitize".
Display when HPA / DCO is set
If HPA / DCO is set (recognized), it will be displayed as follows.
| MEMO |
|
Secure Erase / Sanitize ignores the HPA setting and erases the entire disk,
even if HPA is set. If the DCO setting is set, Enhanced Secure Erase erases all disks, but Normal Secure Erase keeps the DCO setting valid and does not erase the area outside the area restricted by the DCO setting. |
In the example below, the total capacity of the disk is (156.3GB), but because HPA / DCO is set, normal access is limited to (100.0GB).
* HPA / DCO information may not be obtained by the system. Check the capacity of the disk before processing.

In this case, "Secure erase" erases the entire (156.3GB), while the second and subsequent erasures and read verifications are performed for the range (100.0GB).
ATA ST160813AS(100.0GB/156.3GB<!DCOleft>)
It may be displayed like this. This is the display when the DCO is set and it does not support Enhanced Secure Erase.
This message indicates that the part outside the area restricted by the DCO setting will not be erased.
Select the disk using the [up] and [down] keys in the list, and press the [tab] key to proceed to setting options.
* Multiple processes cannot be performed on the same disk on different screens.
Setting "options"
At the time of "Specify Erase method", "Auto Erase with Password", and "Full-Auto Erase", the following preset items are displayed and cannot be changed.
See "Common options" / "Specify erase method".
* You can change the selection / deselection by pressing the [space] key while the cursor is on it. [ ]
[ ] Verify after erase
After the erasing process is completed, read the whole disk and verify that all sectors have been erased.
The verification process is a normal read verification process, unlike Secure erase / Sanitize.
In the case of "secure erase/sanitize (1-time)" processing, the verification is not a confirmation of zero, but a verification that all sectors are the same as the contents of the first sector. This is because that Secure erase writes are not always zero and may be a specific value specified by the manufacturer.
However, depending on the HDD / SSD, a random value may be written, in which case the erasure cannot be confirmed by the verification step. (Counted up as a verification error)
In that case, it is necessary to select "secure erase/sanitize (2-times)" to write "00" after Secure erase, and then execute erasure verification in succession.
The state of [*] is the selection to "verify".
[ ] Stop when error
If a write error to the disk occurs in the middle, you can choose to interrupt the process or ignore it and continue.
If you ignore it and continue, the number of errors is counted.
No errors are counted in the secure erase process. It may occur only in the second and subsequent write / verification processes.
The [*] state is the selection to suspend.
[ ] Log(USBmem,FD)
[ ] Log(HDD)
See "Erase Disks" about Log writing.
Execute Erase
If processing is possible, move the cursor with the [tab] key and press [enter] with "OK" to start erasing.
Select "Cancel" to close the screen.
* The screen display may differ depending on the process.
Screen during Secure erase of ATA(SATA) disk
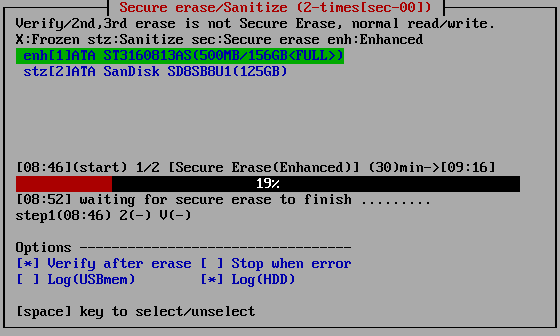
The current processing status and the start time for each step are displayed.
[hh:nn](start) ・ ・ ・ Start time of current step, content of the process. Scheduled end time.
------------18%------------------------ ・ ・ ・ Percentage of progress of the current step
[hh:mm] ・ ・ ・ Current time.
step1(hh:nn) 2(-) V(-) ・ ・ ・ Start time for each step (V is the verification step)
* The progress rate for Secure erase of ATA (SATA) disks indicates the elapsed time with respect to the "processing time" (predetermined). It is not the actual progress rate of disk processing
Screen during Sanitize of ATA(SATA) disk

* The progress rate of ATA (SATA) disk sanitization ends up to 1/65536-> 65536/65536 according to the ATA standard. However, depending on the disk manufacturer / model, it may end up to 1/65536-> 100/65536. In that case, the percentage remains 0%. (Normal processing)
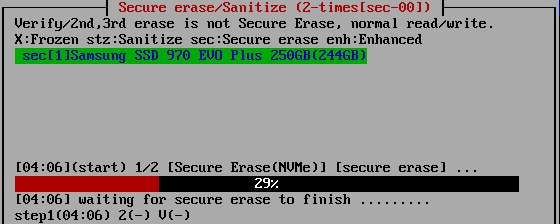
Screen during SecureErase of NVMe
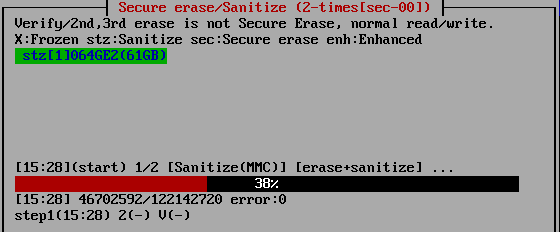
Screen during Sanitize of eMMC
About processing time
Secure erase -ATA(SATA)
The processing time for Secure erase is specified by the manufacturer, and can be known in advance . This value is almost constant no matter what PC you connect to and process. That is why the "scheduled end time" can be displayed on the screen.
The processing time can also be found in "Show current disk status".
However, depending on the disk, that value may not be obtained and may be (0) in the "Show current disk status". In that case, it is processed as 120 minutes. Therefore, it may differ significantly from the displayed time.
In addition, this value is just a guideline, and the actual erasing time may vary. (It seems that it often finishes a little faster)
Sanitize -ATA(SATA)
The processing time of the Sanitize process cannot be known in advance. Please grasp according to the progress of the screen.
Secure erase/Sanitize -NVMe
The processing time of the Secure Erase/Sanitize process cannot be known in advance. Please grasp according to the progress of the screen.
Secure erase/Sanitize -eMMC
Since eMMC processes in memory block units, the progress is displayed in the same way as normal erasing. Please grasp according to the progress
When interrupting processing in the middle
Secure erase -ATA(SATA)
It is possible during the normal erase process, but the Secure erase process cannot be interrupted.
If you want to stop in the middle of the secure erase process, move to another screen (ALT + F1-5) and shut down the system.
At that time, the power will not be turned off automatically. After the end screen is displayed, press and hold the power button to forcibly turn it off.
* If the power is not turned off, the secure erase process will continue.
* (Ver4.5.0 or earlier) If the power is turned off during secure erasure, the HDD password will remain set on the disk and will be locked the next time the power is turned on. It is possible to perform secure erase again as it is, but normal disk reading and writing is not possible at all.
Use "Utility" and "Remove HDD Password" to erase the password.
For the state of the disk for Secure erase, see "About Secure erase/Sanitize".
After the secure erase step is completed, the second and subsequent writes and verification processes can be interrupted. Execute "Abort execution process" on the "Utility" screen displayed by ALT + F5.
Sanitize -ATA(SATA)
For Sanitize process, the processing program can be stopped by executing "Abort execution process" on the "Utility" screen displayed by ALT + F5.
However, the Sanitize process itself continues to run inside the disk.
Even if the power is turned off, the process will continue the next time the power is turned on.
Therefore, once the Sanitize process is started, keep the power of the disk ON until it is completed.
While processing is ongoing, the disk cannot be used because it cannot be read or written.
To check whether processing is in progress, check "process"/Sanitize in "show detail disk information" /"show current disk status".
This content will be updated by returning to the initial menu.
Secure erase -NVMe
The processing program can be stopped by executing "Abort execution process" on the "Utility" screen displayed by ALT + F5.
However, the Secure erase process itself continues to run inside the disk.
It cant be interrupted when the power is turned off.
Sanitize -NVMe
For Sanitize process, the processing program can be stopped by executing "Abort execution process" on the "Utility" screen displayed by ALT + F5.
However, the Sanitize process itself continues to run inside the disk.
Even if the power is turned off, the process will continue the next time the power is turned on.
Secure erase/Sanitize -eMMC
For eMMC process, the processing program can be stopped by executing "Abort execution process" on the "Utility" screen displayed by ALT + F5.
It will also be interrupted when the power is turned off.
Errors that may occur during processing
Secure erase -ATA(SATA)
| error code | contents |
| -3 | Create process error |
| -2 | Process error |
| -1 | Secure erase not supported or frozen |
| 1 | Device open error |
| 2 | Read identify error |
| 3 | Could not unlock ( by user password ) The currently set password is different from the standard "pass" of "Green Pepper PRO", or the password cannot be canceled. |
| 4 | Read identify error |
| 5 | Could not unlock ( by user password ) (after some try) |
| 6 | Could not set HDD password. |
| 7 | Read identify error |
| 8 | Could not set HDD password (after some try) |
| 9 | Secure erase Prepare command test error |
| 10 | Secure erase Prepare command error |
| 11 | Secure erase Execution command error |
| 15 | Remove HDD password error |
| 16 | Read identify error |
| 30 | Secure erase test error |
| 31 | Secure erase process finishes in much shorter time than expected |
| 32 | Confirmation error after secure erase process |
| 40 | read identify error *Secure erase is finished |
| 50 | Verify check error |
Sanitize -ATA(SATA)
| error code | contents |
| -8 | BLOCK ERASE is not supported |
| -7 | OVERWRITE is not supported |
| -6 | CRYPT ERASE is not supported |
| -5 | Unsupported erase type |
| -4 | Sanitize is not supported |
| -3 | Read identify error |
| -2 | Device open error |
| -1 | Unsupported execution parameter |
| 1 | Could not get Sanitize status |
| 2 | Sanitize frozen |
| 3 | Sanitize is executing |
| 10 | Sanitize execution error (CRYPTO_SCRAMBLE) |
| 11 | Sanitize execution error (OVERWRITE) |
| 12 | Sanitize execution error (BLOCK_ERASE) |
| 50 | Verify check error |
| 99 | Process aborted |
Secure erase -NVMe
| error code | contents |
| -20 | Secure erase (format) execution error |
| -17 | Secure erase (format) is not supported |
| -16 | Read identify error (identify ns) |
| -15 | Read identify error (get ns id) |
| -14 | Read identify error |
| -13 | not Block device |
| -12 | Device get information error (fstat) |
| -11 | Device open error |
| -5 | Verify check error |
| -3 | Create process error |
| -2 | Process error |
| >0 | Secure erase execution error |
Sanitize -NVMe
| error code | contents |
| -99 | Sanitize process error |
| -80 | Verify check error |
| -10 | Getting execution log error |
| -3 | Device open error (get log) |
| -2 | Sanitize process type error |
| -1 | Device open error |
| >0 | Sanitize execution error |
Secure erase/Sanitize -eMMC
| error code | contents |
| 1 | Device open error |
| 2 | Device lock error |
| 11 | Setting start area error |
| 12 | setting end area error |
| 13 | erase area error |
| 21 | Device open error(sanitize) |
| 22 | Sanitize execution error |
Confirmation screen at the end of processing
See "Erase disks" about Confirmation screen.
About Log file
See "Erase disks" about Log file.
About the number of erasures
Since it is possible to grasp the status of a write error by performing normal
writing after Secure erase / Sanitize, we have prepared a pattern that performs
writing processing in addition to Secure erase / Sanitize.
However, since
the second and subsequent times are normal write processing, it is not possible
to write to bad sectors that have been replaced, as in Secure erase / Sanitize.
Also, if HPA is set (ATA disk), Secure Erase erases the entire disk, but does
not write to the HPA-protected area from the second time onward.
1-Time ([sec])
This is a process that performs only one secure erase / sanitize.
1st time: Secure erase/Sanitize
2-times ([sec-00])
The process of writing zeros (00) to the entire disk after Secure erase /
Sanitize.
1st time: Secure erase/Sanitize
2nd time: Write 00 (hexary) / 00000000 (binary)
3-Times ([sec-randum-00])
The process to write a random value, zero (00), after Secure erase / Sanitize.
1st time: Secure erase/Sanitize
2nd time: Write a random
value
3rd time: Write 00 (hexary) / 00000000 (binary)
About the number of errors
The number of errors is not counted in the Secure erase / Sanitize step.
If
you perform 2-times erase or more, or if you perform read verification, it will
only be counted in those normal write / read steps.
See "Erase
Disks" for more information.