|
| <- prev |
| Operation of "Boot up Erase Program"-> Boot from CD/USB flash drive |
Boot from CD/USB flash drive
Boot
Insert the "Green Pepper Pro" product CD-ROM or the created bootable CD / USB
flash drive into your computer, and turn on the power.
The system will start
and the screen will look like the one below.
* To create bootable CD, see "Creating bootable
"CD image" file"
* To create bootable USB flash drive, see "Setting
bootable "USB flash drive"
The boot screen differs depending on the Legacy(BIOS) / UEFI boot. The
processing after startup is exactly the same.
* Screen when booting in Legacy(BIOS)
* Screen when booting for UEFI (In the case of secure boot, the background
image may not be displayed)
If the PC does not boot or the OS installed on the
hard disk boots
・ Check the Legacy(BIOS) / UEFI settings. The boot priority of the CD / USB flash
drive may be low.
see "Setting the boot environment on
BIOS/UEFI"
・ The created CD-R may not have been created correctly for booting.
see "How to create a CD from an
image file"
・ The type of USB flash drive you have set may not match your PC.
see "Setting the boot environment on
BIOS/UEFI""Setting bootable "USB flash drive""
・ Your PC may not support booting from the CD / USB flash drive.
see "Setting the boot environment on
BIOS/UEFI"
・ A message will be displayed at startup, and some models will not start from a
CD unless the specified key is pressed at that timing.
example: "Press any key to boot from CD..." message appear at boot time.
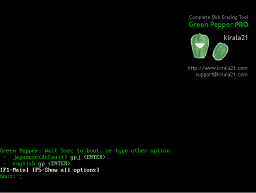
Operation on the boot screen - Legacy(BIOS) boot

Normally, even if you do nothing, it will automatically start the startup
process after 5 seconds.
Press the [enter] key to start immediately.
If there is a network function setting, it will be displayed as follows.
Green Pepper [NET], Wait 5sec ...
If there is a Wi-Fi network function setting, it will be displayed as follows.
Green Pepper [NETW], Wait 5sec ...
* The screen may not switch immediately after [enter], such as when media access
is slow, but please wait for a while.
* If you enter one character within 5
seconds, the automatic startup will stop.
Select other option
The available options are displayed by pressing the "F5" key within 5 seconds.
* Once the screen is switched, the automatic startup will be stopped.
The following is the one when boot from the "product CD-ROM" or
created bootable CD with default option.
The options
that can be selected depend on the option specifications when creating a
bootable CD / USB flash drive.
see "Common
options"
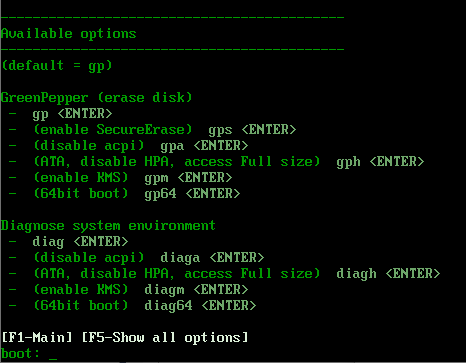
| input | contents |
| gp | Display normal erase screen |
| gps | Display erase screen with Secure Erase menu |
| gph | Disable HPA(HostProtectedArea) and erase entire disk. * Depending on the disk interface, such as when connecting to a USB interface, HPA cancellation may not be effective. see "Points to consider about erasing method" |
| gpa | Start with ACPI disabled * On a general PC, the disk may not be recognized and the power may not be turned off automatically. |
| gpm | Enable Kernel Mode Setting
(KMS). If there is a problem with the display, please try it. |
| gp64 | Start using 64bit kernel |
| diag | Diagnose: Problem investigation screen to check the status when startup
is not completed or disk is not recognized. |
| diagh | Diagnose: Disable HPA(HostProtectedArea) and show problem investigation
screen. * Depending on the disk interface, such as when connecting to a USB interface, HPA cancellation may not be effective. |
| diaga | Diagnose: Start problem investigation screen with ACPI disabled * On a general PC, the disk may not be recognized and the power may not be turned off automatically. |
| diagm | Diagnose: Enable Kernel Mode Setting
(KMS). If there is a problem with the display, please try it. |
| diag64 | Diagnose: Start problem investigation screen using 64bit kernel |
If the startup is not completed
If the startup is not completed and the erase screen is not displayed,
the following causes are possible.
・ The hardware is not compatible with this product.
* Not compatible
CPU, motherboard, and peripheral devices.
* Please remove peripheral
devices and try again.
* If there is a device that can be separated
by the BIOS, try disconnecting it.
・ Media failure (CD-ROM, USB flash drive)
・ Other hardware failures
Please try starting with "gpa" (disable ACPI) etc. from the above selection menu
at startup.
Also, start with "diag" and let us know the contents of the screen at the time
of stop.
If the startup stops halfway and the menu is not displayed, there is no function
to get the screen.
Please take a picture of the screen with a digital camera
and send it to us.
For the operation of the screen displayed by the
"diag" option, see "Using diagnose screen".
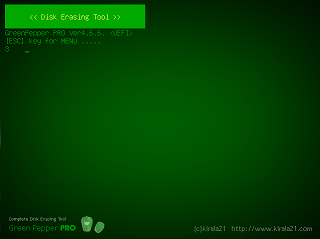
Operation on the boot screen - UEFI boot
"Green Pepper PRO" supports Secure Boot of many PCs, but if the Secure
Boot specification of your PC is not supported , the following boot screen will
not be displayed and a message such as a Security error will be displayed.
In that case, try disabling Secure Boot in the BIOS (UEFI) settings.
Normally, even if you do nothing, it will automatically start the startup
process after 5 seconds.
[ESC]key for menu .....
4
If you want to start with other options, press the [ESC] key before the 5-second
countdown ends.
The following option menu screen is displayed.
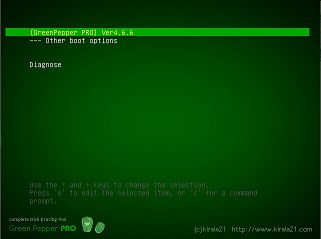
Operation on the option menu screen
Use the "Down" and "Up" keys to select a function, and the [enter] key to
execute the option menu.
Under "---- Other boot options", a submenu will be
displayed that allows you to select more detailed options.
1. Under the "[GreenPepper PRO] English ver4.xx" menu, when "---
Other boot options" is selected.
From this screen, press the [ESC] key to return to the first option menu screen.
Menu Structure
In the standard state, the menu structure is as follows.
The following is the one when boot from the product CD-ROM.
The options that
can be selected depend on the option specifications when creating a bootable CD
/ USB flash drive.
See "Common options"
Option menu structure
selection menu |
contents |
| [GreenPepper PRO] Ver 4.x.x | Display normal erase screen |
| --- Other boot options | Boot option submenu |
| Diagnose | Diagnose: Problem investigation screen to check the status when startup
is not completed or disk is not recognized. |
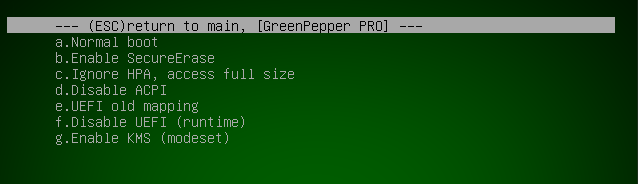
Boot option submenu
| selection menu | contents |
| *--- (ESC)return to main, [GreenPepper PRO] | * press the [ESC] key to return to the first option menu screen. |
| a.Normal boot | Display normal erase screen |
| b.Enable SecureErase | Display erase screen with Secure Erase menu |
| c.Ignore HPA, access full size | Disable HPA(HostProtectedArea) and erase entire disk. * Depending on the disk interface, for example, when connecting to a USB interface, HPA cancellation may not be effective. see "Points to consider about erasing method" |
| d.disable ACPI | Start with ACPI disabled * On a general PC, the disk may not be recognized and the power may not be turned off automatically. |
| e.UEFI old mapping | Set UEFI old memory mapping mode * Use it when UEFI startup stops in the middle. |
| f.Disable UEFI (runtime) | Disable runtime UEFI function * Use it when UEFI startup stops in the middle. |
| g:Enable KMS (nodeset) | Enable Kernel Mode Setting
(KMS). If there is a problem with the display, please try it. |
Boot option submenu (diagnose)
| selection menu | contents |
| *--- (ESC)return to main, diagnose --- | * press the [ESC] key to return to the first option menu screen. |
| a.Normal boot | Diagnose: Problem investigation screen to check the status when startup
is not completed or disk is not recognized. |
| b.Ignore HPA, access full size | Diagnose: Disable HPA(HostProtectedArea) and show problem investigation
screen. * Depending on the disk interface, such as when connecting to a USB interface, HPA cancellation may not be effective. |
| c.disable ACPI | Diagnose: Start problem investigation screen with ACPI disabled * On a general PC, the disk may not be recognized and the power may not be turned off automatically. |
| d.UEFI old mapping | Diagnose: Start problem investigation screen with UEFI old memory mapping mode * Use it when UEFI startup stops in the middle. |
| e.Disable UEFI (runtime) | Diagnose: Start problem investigation screen with disabling runtime UEFI function * Use it when UEFI startup stops in the middle. |
| g:Enable KMS (nodeset) | Diagnose: Enable Kernel Mode Setting
(KMS). If there is a problem with the display, please try it. |
If the startup is not completed
If the startup is not completed and the erase screen is not displayed,
the following causes are possible.
・ The hardware is not compatible with this product.
* Not compatible
CPU, motherboard, and peripheral devices.
* Please remove peripheral
devices and try again.
* If there is a device that can be separated
by the BIOS, try disconnecting it.
・ Media failure (CD-ROM, USB flash drive)
・ Other hardware failures
・ Unsupported Secure Boot specification
* Try disabling Secure
Boot in the BIOS (UEFI) settings.
* If you see the "disable
SecureBoot if stops here" message on the screen and it stops, try disabling
Secure Boot.
Please try starting with "disable ACPI","UEFI old
mappong", etc. from the above selection menu
at startup.
Also, start with "diagnose" menu and let us know the contents of the screen at the time
of stop.
If the startup stops halfway and the menu is not displayed, there is no function
to get the screen.
Please take a picture of the screen with a digital camera
and send it to us.
For the operation of the screen displayed by the
"diag" option, see "Using diagnose screen".